Wednesday, February 29, 2012

DIY Kid's Tent!

It is imposible to deny that I am no longer the mother of a baby but a little girl.  As sad as it is to say that my daughter is growing up, toddlers sure are fun!  And now that she is two I have been slowly converting her room from a place were she only sleeps and gets her diaper changed, to a room for playing and growing.

And today I finished a project that is so much fun...


I made this enitre tent in about an hour (minus drying time), for $10 and I did not have to sew!  (OK. well I sewed one tiny thing but it took absolutely no skill.)

I initially got the idea from the always wonderful Pinterest.  I followed a pin through a few websites until I found Cakies which was just the tutorial I needed to get started.  But so you don't have to follow the trail, I broke it all down for you right here with my very own DIY Kid's Tent Tutorial!

For the frame you will need...

4 - 48" 1x2's
1 - 48" 3/4" wooden dowel
drill with 3/4" spade bit
measuring tape
pencil
paint (optional)

Once the 1x2's are cut down to size measure 6" from the top of one end.  Make an X in the center of the wood and repeat for the other 3 pieces.


Using the drill and spade bit make a hole in each piece of wood at the spot you marked.

 
And now the cutting is done!  The next step is optional.  If you would like, you can now paint the wood with 2 coats of interior paint.  This is not necesary.  I chose to do it because I used older wood that I had in my garage and it was all mis-matched in color.  So I used 2 coats of white paint that I had in the garage to hide the color difference and to make it look more finished.  You could use a bright color to add more pop or as I said skip this step entirely.  But because I did paint, I had to let it dry overnight so it technically took more more than an hour to complete this project, but drying time is not working time so that doesn't really count!

Next, line the holes up on two of the pieces of wood and slide the dowel about 2 inches into the holes. 


Repeat this on the other side and your frame is ready to go.


Next comes the fabric..I used a flat sheet.  I already had it at home so it was free and two of the four sides were already hemmed, unlike if I had just bought fabric at the store.  But whatever you decide to use you will need:

1 piece of fabric - 46"x85" un-hemmed      44"x83" hemmed
4 - 5" pieces of elastic
scissors
either a sewing machine & thread OR Switch Witchery (for the no sew option)

Begin by cutting the fabric (or sheet) down to 46"x85".  Then you will want to hem the unfinished sides.  Because I do not own a sewing machine (or know how to use one) I used Switch Witchery.  Now I have used both Switch Witchery and Heat n Bond and they both work great.


I chose Switch Witchery this time around but either will work!  You can find them both at Michael's in the small section of sewing stuff.  Don't forget your 40% off coupon :)

You want to hem about two inches on each side taking the fabric down to 44"x83".  But don't spend tons of time on this.  Close is good enough for this project.


Next, cut 4 pieces of 5" long elastic.  You will then fold a piece of elastic in half and sew (yes, I used a needle and thread) the piece to the corner of the fabric.  Repeat this in each corner.


So now the frame is complete and the fabric is ready.  All you have to do is put it together! 

Drape the fabric over the frame and hook the elastic around each leg. 


At this point my fabric was drooping a bit in the front.  I adjusted it a bit and then decided to use adhesive dots to attach the fabric to the frame in a few spots.  I only used a few because one of the things I love about this design is how easy it is to fold up and put away so I didn't want to mess that up by making anything permanent.  I added some pillows, carpet circles and Bobby the Giraffe and it was all done!   Doesn't he look happy in there...


I have to admit, as I stepped back and looked around the colorful, fabric filled room I have created for my daughter I thought "wow, I wish I had this room when I was a little girl!!!" 


This post was shared on...


NightOwlCrafting
 
 
HookingupwithHoH

Monday, February 27, 2012

Sew Amazing!!!

I am SEW excited (and yes, I am going to keep doing that the entire post)!!!  My bench cushions are done and SEW fabulous!  Look...


Now before you get all excited that this is going to be a how-to all about sewing your own cushions I have to stop you.  I just don't sew!  I figure, you gotta know your strengths and your non-strengths and although I can sew on a button or hand sew some napkin pillows I am not a seamstress.  I am scared of sewing machines and detailed measuring is way beyond me.  So how did I end up with these gorgeous bench cushions...yup you guessed it, I paid someone and totally don't regret it!!!

I realize this is not what DIYing is all about but let me tell you, my version of a DIY cushion would be DIU...darn impressively ugly!  A friend told me about a wonderful woman she knows, also named Jill, who does seamstress work from her home.  And as it turns out she lives right down the street from me.  My friend said she not only did amazing work but that she is extremely reasonably priced.  So sorry die hard DIYers, I caved.

As I told you about here I ordered this wonderful Waverly fabric from JoAnn's


I have to admit it was even more orange then I had expected but I still loved it and figure the more color the merrier!  I brought the fabric and this lovely sketch to my new friend Jill.


For the details, I wanted the cushions to be 2 inches high.  I also asked for a zipper so I could remove the fabric and clean it if when needed.  I also asked her to add two ties so I could secure the cushion to the bench.  This wasn't my exact design preference but I didn't want them sliding all over the place when my daughter was climbing on them so function won out. 


I also asked Jill to add piping.  We both thought this was a good idea since the fabric was so bold.  The piping could break it up a little.  I also mentioned that if she had any extra fabric I would love a pillow or two!  But that was just wishful thinking.  Except, Jill is a miracle worker and look what I got...  


I am just SEW happy!  Now I do think the orange is a little crazy with my bright red couch but have I mentioned that I hate my couch - oh, I have...sorry.  Well, we are working on replacing it and the replacement will be a much more neutral color so the pop of orange will be fabulous.  For now it is a little Ronald McDonald so I may even put the pillows away until a new couch makes its debut.  


But I have to tell you that I not only love the new bench cushions I love that I may never have to ever sew a thing on my own and still be able to have custom fabric throughout the house at a reasonable price.  Let's hear it for Jill (me and Jill, the miracle seamstress)!!! YIPPEE!


Friday, February 24, 2012

How Clean Is Your House?

Are you a "stay at home" mom?  I put that in quotes because I feel like there is no such thing as a "stay at home" mom.  First off, how much time do you really stay at home?!?!  What we really should be called is a "run from appointment to pick-up to practice to grocery store to friend's house to home" mom.

I fall into a category I like to call "working stay at home" mom.  I work about 15 hours a week as a Personal Trainer and Group Exercise Instructor (in the 80's we were called Aerobic Instructors but have upgraded the term since then).  But since I am so fortunate to be able to take my daughter to work with me I am fully responsible for her while my husband is away all day.  So I get the benefits of working, the benefits of mommying and all the headaches of both.     

Now what does all this have to do with how clean my house is?  Well, I was just vacuuming away and thinking about a dilemma that often circles in my brain and I just felt like I had to share it with you.  And that is the dilemma of the 50's house wife vs the modern mama.  And for me that dilemma usually turns me to question how much should I clean my house.

My husband is a wonderful man, friend and father and we often talk about teamwork...no one task should be solely either of our responsibilities.  We both disciple our daughter, we both cook and um we both clean...kinda.  OK, let's be honest, he doesn't clean much.  But it isn't because he is unwilling.  It is because he works all day, goes to school two nights a week, studies on the weekends, works out like a champ and still makes lots of time for his ladies at home.  So unless he cuts out sleeping, which he doesn't do much of, there is really little time left to fold laundry and scrub the toilets.

But...and here is the conversation I have over and over in my brain...is my life any less busy?!?!?  I run back and forth between work.  I provide for, play with, teach, feed and nurture my daughter.  I write, manage and do everything else involved in writing this blog (which I have to admit is totally my choice and I love it).  And I do all the other "stay at home" mom duties.  Should I also have a spotless house at every moment?

Well, I go back and forth on the answer to that.  I go through phases where I clean like crazy.  I run around any spare moment I am home and make sure my home is perfect.  Then I go through the opposite phase and let everything go.  I call this the "protest" phase.  But lately I think I have found my answer...the One A Day Method. 

I have a list of 5 major cleaning duties that need to be done each week - Laundry, Clean Floors, Clean Bathrooms, Clean Kitchen & Dust.  They are listed on my fridge.  And I pick one item to complete each week day.  So every week each of these items is completed once and for me it gives me perfect balance.  What needs to get done gets done.  But each item on their own only take 30 minutes to an hour (except laundry) so I don't let me entire day be consumed and I still get that wonderfully gratifying feel of taking care of business.        

Now of course there are tons of other cleaning items to be done throughout the day but things like doing the dishes can be done along the way and picking up toys only takes 10 minutes once my daughter is in bed.  So for me, this is my perfect solution. 

What is your solution to the never ending mess?  I would love to hear how you conquer the pressure of being Suzy Homemaker when we all know Suzy has never even been to our homes!

Thursday, February 23, 2012

I Seriously Thought It Was MODGE Podge


OK, I first have to comment on my title.  The entire first draft of this post I was calling it MODGE Podge.  Oops!  It is MOD Podge.  See, I really am a rookie!  But now on to the meat & potatoes...

Did you check out my spring-ish updates to my entry way table?  I’m loving it!  And it helps me to continue my complete denial that I probably have at least another month of winter ahead of me. 

My favorite part is the tray and it was really my jumping off point for all the other items, which is why I am excited about sharing how I made it!  I started with an unfinished wood tray from Michael’s which was only $4.99…what a steal.   I wanted to create a wallpaper type look so I selected a piece of paper that brought in rich but bright colors.  The paper was not quit big enough to cover the entire tray so I also picked up a piece of charcoal gray to fill in the gaps.  And the final piece to the puzzle, Mod Podge.

Now I have to confess that I am a Mod Podge rookie (see note above).  I don’t know how I survived childhood without ever Mod Podging but somehow I did.  So I was a little scared!  But I got a little help from ModPodgeRocks.com.  Yes!  There is a blog all about Mod Podge.  LOVE IT!  And Amy has 3 great videos all about Mod Podging which are totally worth watching. 
Mod Podge Rocks!
But first let me back up…I had to paint the trays.  A simple job.  All it took was a little spray paint which I already had in my garage.  Always remember spray paint works best with multiple thin coats.  It is so tempting to just pile on the paint all at once, but trust me it can lead to disaster.  So slow down, do thin coats and let the paint dry in between each coat.  It is worth the patience! 

So once my three coats of spray paint were completely dry I got my Mod Podge on.  I will give you the basics but seriously, watch the videos!  You use a paint brush (bristle or sponge) to apply a medium coat to the base surface, the tray in this case.  Then do the same to the back of the paper or fabric.  Move quickly as it will dry up on you.  Then line everything up and stick it down.  Use your hand or a roller to push out the extra Mod Podge and to get out the bubbles.  I did this first with the gray paper and then with the colored. 

As ModPodgeRocks warned me, bubbles are a problem.  And I had those problems.


But Amy convinced me to just let it dry before panicking, even though panic was tempting.   Once it is completely dry paint over top of the surface with another 2-3 medium coats – letting it dry for about 20 minutes between each coat.  And guess what, the bubbles do work themselves out!  Now it isn’t perfect but it is pretty darn good and the small bubbles that remain can only be seen if you get up really close.  And I plan to chase anyone away before they figure that out. 

So my Mod Podging maiden voyage is complete and although I doubt I will be creating ModPodgeRocks2, I did have fun and may try it out again.  According to Amy you can really use Mod Podge for a zillion different projects.  Have you Mod Podged?  If so I would love to see what you created!

This post was shared on...

HookingupwithHoH


Monday, February 20, 2012

Awe (Un)Inspiring

The entryway table in my home has gone through many transformations in the past few months.  For my daughter's birthday it looked like this...


For New Years it looked like this...


And for Valentine's Day this...

But as of Friday morning it looked like this...


Blagh.  And that is exactly how I felt about it too.  Uninspired by the items I was finding around the house.  Unsure if it was to soon to bring in more Spring-ish colors.  Unhappy with the idea of decorating for the actual weather outside...snow.  And not to mention Under-funded since we had to replace our water heater unexpectedly on Monday.  Basically Awe Uninspired

But I did have a few things going for me.  Numero Uno, I was happy with my recent mantle redo which I was hoping could guide me in the right direction. 


And Number Two, a $10 gift card to Michael's, a 50% off Michael's coupon and $10 worth of returns.  So the question was could I make this happen and not spend any money?!?!

And the answer was YES!  $10 gift card, 50% off and $10 in cash exactly covered what I needed to create this...

...my touch of Spring Un Inspiration. 


Now stay tuned later in the week for all the details on how I created the tray - for only $6.99!

Thursday, February 16, 2012

As The Guest Room Turns

Our guest room is its own mini-drama.  When we first moved in it was upstairs.  A nice size space with good light and layout but right next to our daughter's room.  She is not necessarily the quietest sleeper which did a great job of keeping our guests awake.  The room also shared her bathroom which meant our guests would be stuck showering with fishy stickers on the wall, purple bubble bath and towels in the shape of animals.  Not ideal.

So...we moved the guest room to the basement.  I have not talked much about our basement on Mission Decorate.  And the only real reason is because I have so many spaces to tackle on the first two floors of our home that the thought of the basement just overwhelms me.  But it is a great space.  A family room with a giant TV left behind by the former owners.  A huge office (with a very questionable grass cloth tiger - not print, actual tigers - wallpaper boarder).  A full bathroom.  A full kitchen - yes a FULL kitchen.  And one more room.

Amazing for guests, right!!!  Except one small issue, the "one more room" has a great closet but no windows.  So according to a real estate agent this is not a real bedroom but it truly is the perfect place for guests, minus a window.  So after some thought we went for it and moved the guest room down to the windowless room.  Our guests have been totally happy with the space.  They all say it is nice and dark for sleeping in.  Maybe I should go sleep down there once in awhile!  But as you can imagine no window means no natural light and no natural light means a design challenge. 

OK, now that I have told you this long story I have to tell you I don't yet have the perfect answer.  Up to this point I haven't done much with the room and I am ready to make a few decisions but as I said I do not yet feel like I have the perfect plan.  But you gotta start somewhere.  So I thought I would start simple - deep red and hints of gold.  This scheme seems to go against the more cool tones I have selected elsewhere in the house.  But I think with some modern updates I can keep this color palate up to date.  And I plan to only use these colors as accents.  Don't worry, I am not painting my windowless room red or gold!  I have no idea what I am going to paint it but I know neither of those colors will be an option.       

So where does the room stand right now?  Well, I started here...


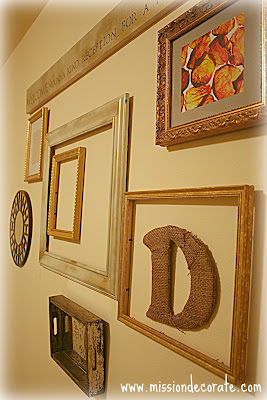
I'm not feeling like this gallery wall is complete but it is a good start.  Whenever I see a gallery wall I am always curious as to where all the great items came from so I thought I would break it down for you.


Let's start with the two frames above.  The larger one you may recognize from here.  It began as a brown frame and with some white and gold spray paint turned into this.  It looked great over the mantle at Christmas time and I am thrilled to reuse it here.  The smaller frame is one of 3 I picked up at Goodwill, $3.99 baby!


I used another Goodwill frame to surround my homemade D that I told you about here.  Cardboard, gold spray paint and burlap.  Super easy and free!

Another free and easy project outlines the top of the space, this sign...


I simply used a spare 2x4, spray painted it white and then added a thin layer of gold.  Using a stencil I already had I added the lettering using a Sharpie!  It left a great faded look and was so quick.

The final Goodwill frame got a piece of gold polka dot paper...


...and this frame, which I picked up at Marshall's, was filled with a pic I cut out of a magazine.    


Now let's see, two more items to round out the gallery wall (for now).  Both from Marshall's, which is my make shift version of HomeGoods until they get smart and decide to open one closer then an hour and a half away.  This great mirror I picked up for $12.99 a few months back


and this tray, also $12.99, which I glued a few brackets on and hung from the wall.  

 
So a mesly start, but something none the less.  One thing I love about Gallery Walls is they are never complete.  They are always changing, growing and filling up with treasures. 

But as you can tell from these pictures lighting is still a huge issue.  So this room will continue to be a work in progress. Nothing I will take on all at once, but something I will keep in the back of my mind and work on as I go.  As always, your suggestions are so appreciated.  Lighting ideas? Wall color?  An offer to come dig out a window?  I'm open!

Monday, February 13, 2012

HGTV's The High Low Project

I just discovered this amazing channel called HGTV.  Ever heard of it??  HA...JUST KIDDING!!!  HGTV is pretty much the only channel I ever tune into.  I could probably survive as one of those non-TV owning families if HGTV didn't exist.  And one show I have been over indulging in lately is Sabrina Soto's The High Low Project.  And I saw the most amazing episode the other day that I just had to share with you.

It was called "A Dream Master Bedroom" and you can check it out here.  In this episode Sabrina helps the Erickson family makeover their Master Bedroom.  The Ericksons have 5, yes FIVE, boys.  They have a huge Master Bedroom space but it is pretty much empty.  So to Sabrina's pleasure she got to start from scratch.  I bet it is just the worst for those designers when the client says "you just have to work this piece into the room" cause it is always something horribly awful.  But in this case she had a clean slate to work with.

So the premise of this show is Sabrina first puts together the client's dream room with absolutely no concern for budget.  In this case the first design comes to the grand total of $46,000.  WHAT!?!  I can't even imagine working off a budget like that for one room.  Especially one that needs no structural changes!  That was 46k in only furniture.  Then she recreates the same space for whatever the client's actually budget is.  And what was the Erickson's budget??? $6,000.  Which is not bad but way different then $46,000! 

So what did they come up with?  Well watch below...


Just dreamy!  I absolutely love the color palate.  They gray putty color on the walls is fabulous.  I am totally obsessed with the idea of changing up the traditional beige / brown neutral color palate for rich grays and what seem to be cool tones that amazingly lighten and warm a space.  In addition, I love the layering.  This is a skill I have not yet mastered.  I am always amazed when someone can bring different patterns, textures and feels into a room but still make it look cohesive.  But most of all I LOVE the concept because it is exactly what we are all trying to do in DIY land...recreating a look on a budget while keeping the luxury and style.  And Sabrina just nailed it!  You go girl!

What is yoru favorite HGTV show?  Oh come on, I know you watch it all the time too! 

Friday, February 10, 2012

Big D, Little D, What Begins With D

Can you tell I have been reading to many Dr. Suess books?  I do love how he takes it upon himself to just make words up whenever he sees fit.  I mean what is a Fiffer-feffer-feff? Sorry, focus Jill, focus!  So what am I really writing about today...ahh yes my new D.

Seeing as how I have already laid out my two major spending projects for the next few weeks (cushions for the family room benches and bedding for my daughter's soon to be purchased Big Girl Bed) I have been trying to pinch pennies elsewhere.  And today's project is perfect for that seeing as it was FREE.  I smile every time I type that word.

If you remember way back when I made this frame


I mentioned that it would not only be used for Christmas decs but would then be used again in the guest room.  Well, I am now swinging back around to the guest room project and needed something to go inside of this frame, which is what the D is for.


I started out by cutting a piece of cardboard from the huge pile in our garage - our recycling bin needs to be 3 times bigger.  And then I used this wood D I bought from Michael's and painted black long ago to trace the letter.


Simple, simple, simple...


Next I went back to the garage and spray painted the now cut out D gold


After I let it dry for about an hour I started wrapping and gluing the burlap scraps from another Christmas decoration.  A few hot glue burns later my D was done.  The effect is great.  You can see the gold peaking through the burlap and the spray paint totally hides that it is made of cardboard. 


And here is a sneak peak of how it is going to be used...


But more about that later.