Monday, October 31, 2011

A Very Gold Christmas

Merry Christmas everyone!  What...wrong holiday...is it to soon???  I would have agreed with you a week ago but then I started thinking about my plan for Holiday Decor and all of a sudden I couldn't wait.  Bring on the cheer! (And ghost and goblins of course!)

So what is the plan?  GOLD!  Not over the top, wow I just walked into a pawn shop gold.  But instead a subtle gold theme tying everything together. 

As the wheels have been turning the Pinterest board has been growing.  And that is where I found this...

Pinned Image

...which can also be found here on Etsy.  This great wood piece got the Christmas creative juices flowing so I jumped right in to my first Pinterest / Gold Holiday project.


I started out with a piece of plywood cut down to size and an itty bitty can of gold spray paint.  (Let me quickly say that I bought 1 piece of plywood months ago and I have used to over and over for so many projects that as soon as I use this one up I am going to run out and buy another one just to have on hand.)


I probably should have bought the bigger can since the gold theme will no doubt involve more spray painting but I didn't think of it at the time and I am certain there will be another trip to Michael's in my near future.  And buying the little can (which I used all of) kept my costs for this entire project down to $8...but now I am getting ahead of myself.  Back on track.

I sprayed the plywood, let it dry over night then pulled out my trusty stencils, the Santa Red craft paint also bought at Michael's and got to work. 


Some simple taping and measuring to make sure my words were straight(ish). A little dabbing and some messy hands and in about an hour the project was done.  I added some white swirls to break up some of the words.  And everything started to come into view.


So for $8 (spray paint, craft paint and one more set of stencils plus a 40% off coupon for one item) the first of many Holiday projects is complete.  I plan to use it as the center of my mantel design, but since it is still October (until tomorrow) I figured I can't put it up yet.  Or can I?!?!?!  It is just so pretty...


This post was shared on...


Todays Creative Blog


Wednesday, October 26, 2011

A Weeee Bit Scared

Halloween is just around the corner and so are all things scary...BOOOO!  And although I am scared of many Halloween related things - bats, scary movies, spiders, oh and did I mention BATS - this scary post has nothing to do with those things.  Instead it has to do with the looming project that I am a weeee bit scared of, cue scary Halloween music.

As I teased the other day the DIY room is almost painted but there is more in store...stenciling.  I was inspired by this amazing stenciling job done by Sherry and Jon over at Young House Love.    


But I thought that since I am working in a closed off room that is really meant just for me that I should go bolder.  So I searched around Cutting Edge Stencils and found this great Damask pattern...

moroccan-damask-stencil

And then loved this bold color pallet...

moroccan-damask-stencil

WOWZA...so I decided to go for it.  The stencil arrived in the mail a couple of days ago and yesterday I made my way to ACE to select my crazy color scheme.  As you know the room is getting a blue / gray base coat so I thought a rich plum purple would be a great combo.  And that is exactly what I found, Benjamin Moore Plum Perfect.


So I have a quart of Plum Perfect, a small roller, the stencil, stencil adhesive, a clip-on stencil level (also bought at Cutting Edge Stencils) and the background color is almost complete but now I am scared!  I have never stenciled on this scale before.  I have watched the how-to video on the Cutting Edge Stencil site and although they make it look easy I still have my doubts.  And since I have a strange independent streak I have yet to ask my husband or friends for help.  Is that a mistake?  Have any of you stenciled a full wall?  Is it a two person job?  Help!!! 

Monday, October 24, 2011

A Little Shopping

Good morning everyone.  I'm hoping you all had a great weekend!  And I'm hoping you all saw my Facebook note that Target was having an online Home Sale.  (If not maybe it is time to like Mission Decorate on FB!)  Well, we made good use of the sale if you didn't so not to worry. 

Do you remember this post when I mentioned our idea to add benches to our family room?  Something like this...


We talked about building something but as my husband so eloquently expressed "I don't want them to look ghetto" and to be honest there was a good chance of that happening.  But of course I didn't want to just buy a finished product either.  Not only because I love personalizing and creating but also because what we want is expensive!  Like these benches we spotted at Ballard Design for $325.00 a piece...EEK!


Classic Bench

So while browsing the Target online home sale for anything that caught my eye I stumbled upon this...

Farmhouse Bench - Unfinished
The "Unfinished Farmhouse Bench" for $89...YES PLEASE!  Its like it was calling my name- unfinished, the perfect size and in need of some DIY upholstery - Jill, Jill Buy Me! So I did, I bought 2 actually.  Signed, sealed and soon to be delivered (with Free Shipping to boot).  I can't wait!

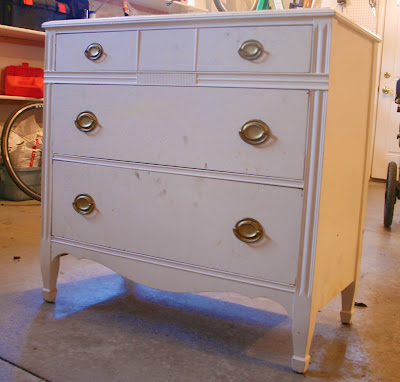
And in addition to the benches I also had another Craig's List adventure.  I call them adventures because honestly they always are.  There is always some interesting story or person I meet.  Or in this case an adventurous drive home with my trunk tied shut with one piece of string and a dresser hanging out the back.  But all worth it (and the $40 I spent) for this find...


With some paint and sprucing up it is going to be perfect storage in the DIY room!

So a pretty successful weekend of shopping and saving.  Ahhh, the perfect combination of bliss.  I hope your weekends were as fabulous!

Thursday, October 20, 2011

Canvas Table Cover

One of the first projects I took on in my soon to be beautiful DIY Room was to somehow cover the folding table I use as my work space.  I thought about replacing it with something fancier, but I like the size and how easy it is to move and it was perfect for my tight budget...FREE!  So I got creative. 


I started off with a 4 x 15 canvas painters drop cloth that I picked up at my favorite local Ace Hardware.  I liked the durability of the canvas as well as the neutral upcycled look it brought to the space.  I cut it down to size (just long enough to barely skim to floor) and then had some fun with it...


I mixed some craft paint together I already had around the house to create the variety of colors and I picked up some plastic letter stencils at Michael's.  I will admit it was a little tricky selecting the right stencil.  They had some paper options but I just wasn't sure paper would be easy to reuse.  Then they had some small letters and really big letters, which by the way looked medium sized from the packaging but I did a little in-isle opening to peek and see what I would really be getting.  At this point I was starting to get frustrated, especially since my daughter had begun to fill the shopping cart with every color craft paint in the isle, but then I found just what I was looking for - 4 inch high plastic block letters.

Oh and let me share the one thing I discovered while reading the always brilliant Young House Love that I will now never go without... Martha Stewart (yes, my enemy) Stencil Adhesive Spray.   


You simply spray the adhesive on the back of the stencil and it sticks perfectly to the fabric (or wall or whatever you want it to) but it does not leave a film or residue and the stencil peels right off when you are done.  Totally worth the $5.99 - well actually less with the 20% off Martha Stewart products coupon I found on the Michael's website.  Have I ever mentioned never go to Michael's without printing off their weekly coupons first...oh I have, sorry ;) 

Well now that the stenciling was complete I wanted to tweak the drop cloth to hide the ugly folding table legs.  So I laid the fabric on the table and just started pinning.  Since we all know my sewing skills are in the negative category, I wanted to find a simple solution that took minimal sewing so I came up with this...


A few stitches at each corner and mission accomplished - the less then attractive folding table was not to shabby looking!


I have also gotten started painting the room.


Do you think anyone would notice if I just left it like this?!?!?  This color is actually my initial pick for the dining room.  I made the rookie mistake of selecting a color and buying a gallon of it right there on the spot.  And of course when I got home and sampled it on the wall it was to blue...ugh.  But I liked the color all along so I am thrilled to have found a way to use it!  But this is just the start, there are much more exciting things to come for my little DIY Room in the paint department.  Yes, that is a teaser...hehehe!

This post was shared on...

HookingupwithHoH


Tuesday, October 18, 2011

Begin at the Beginning

I admit I was a little bit daunted by the disaster that had become my DIY Room (formerly known as "My Room" - I thought a new name was needed).  But last week I promised you that I would reclaim the space and return it to its once dreamt of glory.  So the only thing to do was jump in and begin at the beginning...cleaning...ugh.

As you may remember the room has been a dumping ground for outgrown baby clothes and maternity wear mixed with the chaos of all my craft / building / creating tools.   It looks something like this...


Yes, those Easter Eggs still have candy in them (YUCK!).

I got started with the baby clothes.  In figuring that one day there might be a chance of another baby and there is a 50% possibility that baby would be a girl, I should organize all the adorable goodness, also known as baby clothes, by age.


I bought some Halloween themed tubs to go with my already existing Christmas tubs at Target.  During the holidays you can find these babies for $4.99 each and if you don't mind the colors it is a great deal!  I used the wonderful chalkboard vinyl labels I bought from Bradens Grace to label everything and by the time I was done the room already looked SO much better.    


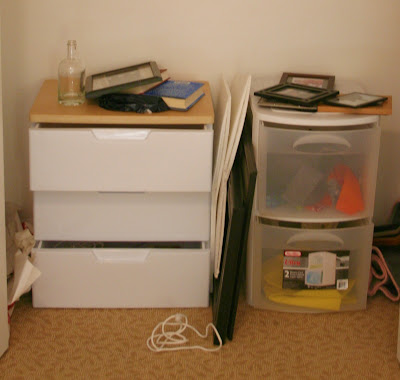
Next I cleared off the completely cluttered table and piled everything into the closet drawers.  I did a little organizing but figured the rest would need to wait until I decided on a bookshelf / dresser / storage solution.

Then I threw away a lot of trash - paper, receipts, fabric scraps, paint samples - and I was left with a clean slate.  Ahhhhhh!


Yes, that is a paint can you see in the middle of the room.  So on to bigger and better...painting!

Friday, October 14, 2011

Etsy Shop of the Month!

So I am a little late, well actually a lot late, on the Etsy Shop of the Month for October but this one is worth the wait!  I have been reading Diana's wonderful blog, Our Vintage Home Love, for a while now and I am constantly amazed by the beautiful pieces she dreams up to create a vintage, upcycled, classy look.

Just look at her fabulous dining room...


and bedroom...


Ahhhh gorgeous!  Well recently Diana started an Etsy Shop to sell her to-die-for Bread Boards.  (You can see a sneak peek hanging on the wall in the dining room pic above.)  Diana tells a wonderful story on her blog about how the bread boards came to be and here is just a piece of it...

"It's no secret that I have a huge love for bread boards.  And anyone that reads my blog has come to know how much love, respect and admiration I had for my dad.  My dad loved to cook, as well as, wood work and he would often share his creations with me.  I often told him of my love for bread/cutting boards and how I couldn't find just the right one or if I did, it was too expensive.  He simply said, "why don't you try making them?"  So, I did.  He died before he ever got to see them."

Diana began by making bread boards for friends as gifts and now she can't seem to make enough!  Her Etsy shop is a huge success and her bread board sets are perfect for hosting a dinner party, giving as gifts (Holidays are coming up!) or displaying on your walls.

Here are just a few samples of what you will find at Vintage Home Designs

Bread Boards

Now if you are interested in purchasing some of these lovely boards you will have to visit Vintage Home Designs on Monday mornings because Diana sells out weekly and lists more each Monday morning.  But they are worth the wait because they are just that great.  So set your alarm for Monday morning and get to shopping!

Thursday, October 13, 2011

A Confession

Does anyone remember this?


Well, it was the extra bedroom that was supposed to become My Room.  Yes...that glorious space where I could create, plan, store and have some piece and quiet.  That Mom Room we all dream of!  But I have to confess that those dreams have been replaced by a total mess.  And the worst part is I can't even blame anyone else for it.  I am totally responsible!  I have let all kinds of stuff pile up and done nothing about it.  

Like outgrown baby clothes...


A pile of maternity clothes (yes, my child is almost two)!


Let's see, what else...paper.  Yup, blank paper that was supposed to be used for something sometime.


And my "work" area looks like this...


and this...


Yes, there is a table underneath all that somewhere.

And the "well organized" closet is well...not organized at all.


Not to mention that there is no paint on the walls, no furniture in the room and really nothing else to speak of. 

But I have been hesitant to put any money into the space because I just don't know if I will use it.  Most of my projects are noisy (read - I am noisy).  And this room is right next to my daughter's.  Since you all know that most of my projects get done when she is sleeping that just doesn't work.  But I do need a place to store all my junk  goodies rather then letting them spread all over the house.  So I think it is time to do something about this. 

Here is what I am thinking...could I do this entire room for $250 or less?  I need book shelves, drawers, paint, seating and a few things to pretty it up.  I just don't know???  But I am willing to try!!!!  So that is what I will be working on for the next couple of months (in addition to the rest of the long list). 

I would love your help / ideas for craft storage on the cheaps!  I'm sure you guys have come up with some great stuff so please share!

Tuesday, October 11, 2011

Breakfast for the Bride


I had the amazing pleasure of attending the wedding of my oldest and very dear friend this weekend.  And not only was the wedding beautiful and sincere and real, it gave me the opportunity to spend a weekend in New York City.  My husband and daughter were unable to attend so I was a woman on the loose.  Well not really, but I like to remember it that way :)

As part of the wedding festivities my mother and I threw a ladies breakfast for the bride.  A wonderful opportunity for all the women, both friends & family, to gather to celebrate the occasion.  It was a wonderful event and mom and I had a great time planning it!  Because we were both traveling to NY we kept the decorations simple but everything turned out lovely. 

We began with favors...small, bright & colorful dishes filled with candy, to later be used for jewelry, nick-knacks and whatevers.


We found the bowls at Pier 1 and ordered them in a variety of colors.  Only $2 each!  We also designed and made the place cards.  We used the art from the invitation which was created by the professional artist / fiance.  Unique and fantastic!


We snuck in a quote on the back which was a line from the bride's favorite movie as a kid - The Blues Brothers.  Has anyone seen that movie?  If so I give you 2 guesses as to what the quote was.  Hmmmm?!? 

The rest of the decorations where what was to be expected - flowers in vases - but with a twist.  Rather then have a florist use plan glass vases we bought 6 vases from West Elm, had them shipped to New York and not only used them to brighten up the tables but later gave them to the bride as her wedding gift.  She was thrilled and I was a bit jealous.  Thought about taking them home for myself...but didn't. 


And my favorite filled with Chinese Lanterns...


And not to mention the view from the room was fantastic.


It was a wonderful morning, weekend and memory.  Cheers to family, friends and the power of love.  Have a great day everyone!