Friday, December 30, 2011

From Christmas to New Years

Another Christmas has come and gone which means it is time to ring in the New Year.  We will be kicking off 2012 with family style party.  Yup...adults, kids, come one come all.  Actually my plan is fool proof.  The party will kick off early (5pm) with yummy food and a little kid chaos.  But just when things start to get out of hand, ding-dong, the babysitter arrives!  Kids + basement + movie and popcorn + babysitter = a few moments of adult sanity.  Now, I have no visions of grandeur.  We all know the kids will need us for this or that or who knows what, but even 5 minutes of adult conversation will be glorious.  Isn't that sad.

OK, so assuming the plan is a hit the next step is a little decorating.  Many of the Christmas decs have come down but others are just getting a New Year twist.  I figure no need to start from scratch!  So I started with the mantel which looked like this for Christmas...


I packed up most of the items and made an $8 splurge to buy 12 mason jars.  I stuffed the jars with a strand of lights, plugged it in and gorgeous!  I may leave this up all winter. 


Then I made some quick cut outs from fun paper I picked up at Michael's, hung them in the frame I created for the Christmas mantel and in a snap had a ready for New Years mantel!


Next I reused the N-O-E-L I created for the entryway.  Remember this


Well with a little more paper from Michael's it now looks likes this!


With hats, blowers and bead necklaces ready for party-goers.  (This was a fun little party kit I picked up at Target.)

Then I switched out the ornament filled hurricane to fit the party mood.  From gold, green and red...


...to gold and silver. 


I spread some fresh flowers around the house and we are ready to go - adults, kids, dogs and all.  Bring on 2012!

Wednesday, December 28, 2011

Taking It One Step At A Time

Pinned Image


One of the many wonderful things my husband has taught me is the idea of breaking down my annual goals into quarters.  You know, January thru March, April thru June.  You get the idea.  To me this is a game changer.  I used to avoid setting annual goals altogether because I thought it was so silly to say I was going to do this or that next November when we all know that we have no idea where or what we will be doing by next November.  I mean if you would have told me two years ago that I would be living in Wisconsin by the following November I would have fallen out of my chair and said "what you talkin about Willis"!  So...I take it three months at a time.

With all that said, what are my goals for the Q1 of 2012?  My first goal is the guest room.  I have had some ideas and a plan floating around in my head for a couple of months now.  I have picked up a few items here and there, but it has come time to put it all together.  My current plan is very simple but I do think that as it unfolds things might get a little more complicated.  The reason is our guest room is not technically a bedroom.  It has no windows.  This allows guests to get a great night sleep but makes for some very odd lighting - read no natural light at all.  So although I am hoping some lamps will do the trick, I fear a complete paint job might be needed.  But first I will do what I can to avoid that and then see how it turns out.

Goal two is this...


I am totally embarrassed to have even shown you that picture.  Yes, it is the mudroom / mudspace (calling it a room is a little aggressive).  And no, that mess is not staged for this pic.  It is a disaster.  And this is mainly due to the complete lack of good shoe organization.  And in a snowy place like Wisconsin a functional mudroom is key!  So I'm hoping to come up with some sort of organization plan to transform this space from useless to useful. 

Next, it is time to move my daughter into a big girl bed (cue dundundun music).  This is a minor project design wise but will take a little bit of tweaking her room layout as well as selecting bedding and all that fun stuff.  The truth of it is, it will be more of a parenting challenge to keep her from wandering the house at night.  But that is an entirely different episode. 

And lastly I want to be better to Mother Earth, specifically recycling.  We recycle but our one trash can under the sink just doesn't provide us with a good enough system.  It is hard to access, fills up so quickly and then things that should be recycled just end up in the trash.  Really no excuse to throw a single piece of paper in the trash!  So this is something that has to be fixed.

Now, I am sure more projects will be added along the way, as they always do but I feel like this is a good start.  I would love to hear what you are planning for the new year.  "Like" the Mission Decorate Facebook Page and share your list there!  

Monday, December 26, 2011

Bottle Cap Creation

How was your Christmas?  I am assuming that since you are back in blogland that you survived! We had a wonderful weekend full of friends, family, food and fun.  And the gifts weren't to shabby either.  My wonderful husband scored big with these great napkins from Anthropologie...


and the gift I have been asking for all year long, the wonderful floor cleaning steaming magical machine known as The Shark.  I was in love at first site (please excuse the still in my PJs haven't brushed my hair scary picture of me)...


I used it right away and it is great.  My hardwood floors have never looked better.  And my favorite part, it only needs water.  No toxic chemicals that my daughter later crawls around on picking up dropped food.  (Come on, you know it happens.)  It rocks!

What else rocks is the kick a&* book I got from my brother and sister-in-law...


Reader's Digest Complete Do-It-Yourself Manual.  Need to repair drywall?  It is in there.  Need to install a ceiling light fixture?  It is in there.  Need to extract a stubborn screw?  Yup, you guessed it.  It is in there!  Totally awesome!

Now, I did do a little gift giving myself.  I gave both my sisters-in-law great maps from Jenna Sue Maps - our Etsy Shop of the Month.  My mom, a cozy throw from Pottery Barn.  And of course my daughter made out like a bandit.  But the one gift I did DIY was this gift for my husband...


It is Beer Bottle Cap Art!  I spent a few weeks hunting down and purchasing some of his favorite beer caps on eBay.  My best find was four Tiger Beer bottle caps shipped all the way from Malaysia! 


Then I got to work assembling them into art.  I started with a $1 recycled cabinet door from the ReStore.  Sanded it a bit and patched the hardware holes.  Then I painted it black.  I had read online that all I needed to do to attach the caps was to hot glue them on but I was worried this plan would leave globs of glue in between each cap...yuck  So what's a girl to do other than roam the isles of Michael's until you come up with a solution.  (Wandering aimlessly is where much of my inspiration comes from.)


Eventually I found these alphabet beads.  They were each just a bit taller than the bottle cap so I glued one to the underside of each cap and then glued the bead to the cabinet.  And it worked great!  I love it when a plan comes together and when a gift is a success :)  


Did you DIY any gifts?  Share them with us on the Mission Decoreate Facebook Page!

Sunday, December 25, 2011

Merry Christmas To All

Pinned Image


Merry Christmas to my Mission Decorate Family!  May your day be full of love & laughter.

Wednesday, December 21, 2011

All Wrapped Up

Did anyone else see the totally awful show about selling Spelling Manor?  I'm embarrassed to admit I watched it.  But it comes to mind now, as I post about wrapping, because there were 3 "Wrapping Rooms" in that house.  Yes, THREE!  Mrs. Spelling claimed she wrapped over 900 gifts each Christmas.  Totally outrageous! 

Well, I am no professional like she is.  I don't even claim to be good at it.  I seem to lack some of the patience and attention to detail to really do it right, but I did decide to have a little fun with my husband's gift wrapping this year.  I figure even if I'm no good, maybe I can distract him with bright colors and shiny things.  So I played.  Lots of mis-matching ribbon, paper, patterns and ideas.  And it turned out a little crazy and a little good.  Hope you like!


And my "big gift" for my husband this year I actually made!  I can't wait to share it with you once he opens it of course.

Monday, December 19, 2011

One Last Monday Holiday Tip...


...is actually not a tip at all.  Christmas is in 6 days.  If you don't have your decorating done by now I think it is safe to wait until next year.  So instead I thought I would share one of my favorite holiday cookie recipes with you.  Triple Chocolate Cookies from my favorite 500 Cookies  by Philippa Vanstone. 


Pinned Image

You will need:

1 cup all-purpose flour
1/2 cup unsweetened cocoa powder
1/2 tsp baking soda
1/4 tsp baking soda
Pinch of salt
1/2 cup (1 stick) sweet butter
1/2 cup granulated sugar
1/2 cup light brown sugar
1 egg
1 tsp vanilla extract
1/2 cup semisweet chocolate chips
1/2 cup mint chocolate chips**

**The recipe actually calls for white chocolate chips here but I don't like white chocolate and for the holidays the mint is so yummy.  Or you could use peanut butter chips!

Preheat the oven to 350 degrees. Sift together the flour, cocoa powder, baking soda, baking powder and salt.  Set aside.  Beat the butter and sugar until smooth and creamy, and beat in the egg and vanilla extract.  Add the flour mixture and mix until almost blended.  Add the chips and mix.

Scoop the dough onto a baking sheet 2 inch apart.  Bake for 12 to 14 minutes.  THEN EAT!

I hope you enjoy this week.  Christmas is my favorite day of the year.  It turns me right back into a 7 year old.  Now I just have to remember to let me daughter have some of the fun ;)

Thursday, December 15, 2011

One Year Ago...

...Mission Decorate was born.  My husband, daughter and I had moved to Madison, WI from San Francisco.  We had been living in temporary housing for three months and on December 10th we closed on the house we now love to call our home.  I had been reading similar blogs for months and I knew this was my opportunity.  I was no longer working full time and I had a clean slate.  Our new home was full of white walls with plenty of room to work.  I had always loved to write and always loved to watch other people design and I just felt like why not me...now or never baby. 

So on December 17th, 2010 I welcomed you into my home and set out on a new mission.  That mission "is to decorate our home over time in a thrifty, warm and comfy way...and to share the journey with you as I go."  Shall we look back and see where the first year has taken us?

My very first post showed off such lovely images as...


...the sun room busting at the seems with boxes - but still sporting a few Christmas decs, may I add.  Well, look at it now!


The perfect playroom for my daughter (who turns two next month...eek!)  I shared with you the scary white baby room.


Ugh...a little brighter now!!


Since then I have done a little furniture building and refinishing as well...


And a few more rooms have been transformed...


But this is just the beginning.  I have enjoyed every moment of the past year - the successes, the do-overs and most of all sharing it with you.  Thank you for your support, friendship and motivation.  Without you this house would still be white.  Cheers to a year well enjoyed and to another year of fun!

Tuesday, December 13, 2011

Idea Board

As promised in this pic (numero 6) there was one final project to complete for the DIY room.


And now it is done!


This Idea Board was inspired by the mobile that used to hang in this room.  (Check it out here.)  Although I really liked the mobile the style just didn't really work in the room anymore so I came up with a new idea to display my inspirations / project ideas / stuff I like. 

I made a quick trip to one of my favorite spots, the Habitat for Humanity ReStore, and I picked up a used cabinet door.  These babies can be used for so many great things (like this) and they are only one buckaroo.  Exactly my price range!

After patching up the holes from the door pulls, I painted it with the left over paint from my wall stenciling.  Then I strung fabric across, added some clothes pins and hung a little bit of this and some of that.  Stuck it up on the wall and the job was done.  $1 spent!


Now, in full disclosure I do have to tell you that their was one more part to this story.  And since I always want to be sure to share my unsuccesses with you as well as my successes I do have to spill the beans on the minor set back that went along with this.

You know that saying fool me once...fool me twice.  Well lets just say that I am again the fool due to Martha Stewart.  Yes...Martha is back.  I made the fatal mistake of giving her one more shot and I bought her magnetic paint at Michael's.  The original idea was to make the door magnetic and hang things with cute homemade magnets.  I followed her directions and applied 3 coats of magnetic paint under the purple coat.  But when I hung it up the force wasn't enough to keep anything in place and the magnets slowly slid right down.  I mean maybe 8 coats would have been enough but that is just crazy!  So a last minute change of plans led me to the fabric being hung across.  And left me with these cute button magnets which I already made and love.


But yet again a poor review for a Martha Stewart product.  I swear this is the last time I will waste my money on her!  (Please hold me to that!)

Monday, December 12, 2011

How do you show off your cards?

There are so many creative ways to display Christmas cards.  So many in fact that I just can't pick one, but the adorable family pics have already started rolling in so I better decide on something fast! 

But in the mean time I thought I would share a few of my front runners with you.  My first favorite idea is this from Pearls, Handcuffs, and Happy Hour...

shutters2

So what are those???  SHUTTERS!  Great, right!!!  She spray painted a couple of shutters red and stuffed them full of all her Christmas cards.  I just love this!

My next idea I stole from one of the dozens of Target catalogues that have shown up in my mailbox the past few weeks.  I don't even think this item was for sale.  I actually think it was just being used to sell photo cards, but it grabbed my attention and helped me come up with this simple idea.  Which unfortunately I have no pictures of.  So close your eyes and just picture it for me...

Take a wreath form (you know, the styrofoam kind).  Wrap wide satin red ribbon around it to cover up the styrofoam- perhaps using some glue along the way.  Hang the wreath with a green bow and then as those cards begin to arrive pin them to the wreath with small push pins.  Fill every inch of the wreath and hang it on your wall, door or put it up on the mantel!

I also really like the simple idea of hanging cards like a garland  or banner.  Here are a few of my favorites...

From Tilly's Cottage look at this great pom-pom ribbon


And from Centsational Girl, this looks great from far away

hanging from office window


But look up close at how she is hanging those cards!

jingle bell from afar copy

Jingle Bells!

And my final contestant, which I actually think is going to win out because I am so short on time and I have all the supplies, is this card holder made out of candy canes!  I found the pic here but can't seem to find much more info on it.  I assume you can attach a piece of cardboard to the back to make it stand up.  I will try and let you know!

Pinned Image

So happy card opening and displaying.  Just 2 more weeks till Christmas!

Friday, December 9, 2011

The DIY Room Breakdown

As you know the DIY room is complete, but I did promise you the full room breakdown so here it is!


#1 Plate Wall - The plate wall was a very simple project that helped break up the pattern of the stencil.  Here are the details of all the plates and how I mounted them on the wall. 

#2 Chic Lamp - This great lamp is from Target.  Yup, Target!  It was about $30 with base and shade.  It had a few scratches on the white base so they gave me a discount at the register and I touched it up with white out!

#3 Table Top Decor - If you look close you will see the work space is filled with all kinds of goodies.  What, you want to look close.  OK...


I filled an old pesto jar with turquoise buttons and a vase with left over ribbon and fabric.  I displayed an empty (yes, drank by me) beer bottle and a glass jar I kept from some fancy soap I bought years ago.  The star is from the dollar bin at target as well as the bucket filled with the items I use daily - scissors, glue gun, screw driver - you know the basics.  But the take away here is I found almost everything in my house.  Only $2 spent!

#4 Table Cover - The table cover began as a painter's drop cloth and with some trimming and stenciling turned into this.  Read the details here!

#5 Apple Green Chair - Where oh where did this mysterious chair come from.  Well, the answer is here...


Yup, I stole it!  I painted this chair almost a year ago for the kitchen table.  It is a great chair but not quite sturdy enough to function as the jungle gym my daughter has turned it into.  So it has been given a new job in my DIY room and now the hunt is on for a new chair to replace it downstairs.

#6 The Pin Board That Will Be On This Wall - I am currently working on one last project for this room - a magnetized, used to be cabinet door to hold all my project ideas.  So keep an eye out as for that to be completed. 

#7 More Table Top - The table top thriftiness continued over here... 


A washed out pickle jar filled with nails and thread.  Another dollar bin bucket holding all my paint...


Some skeleton keys displayed on a plate and a Goodwill metal box filled with fabric.  Simple, cheap and functional.

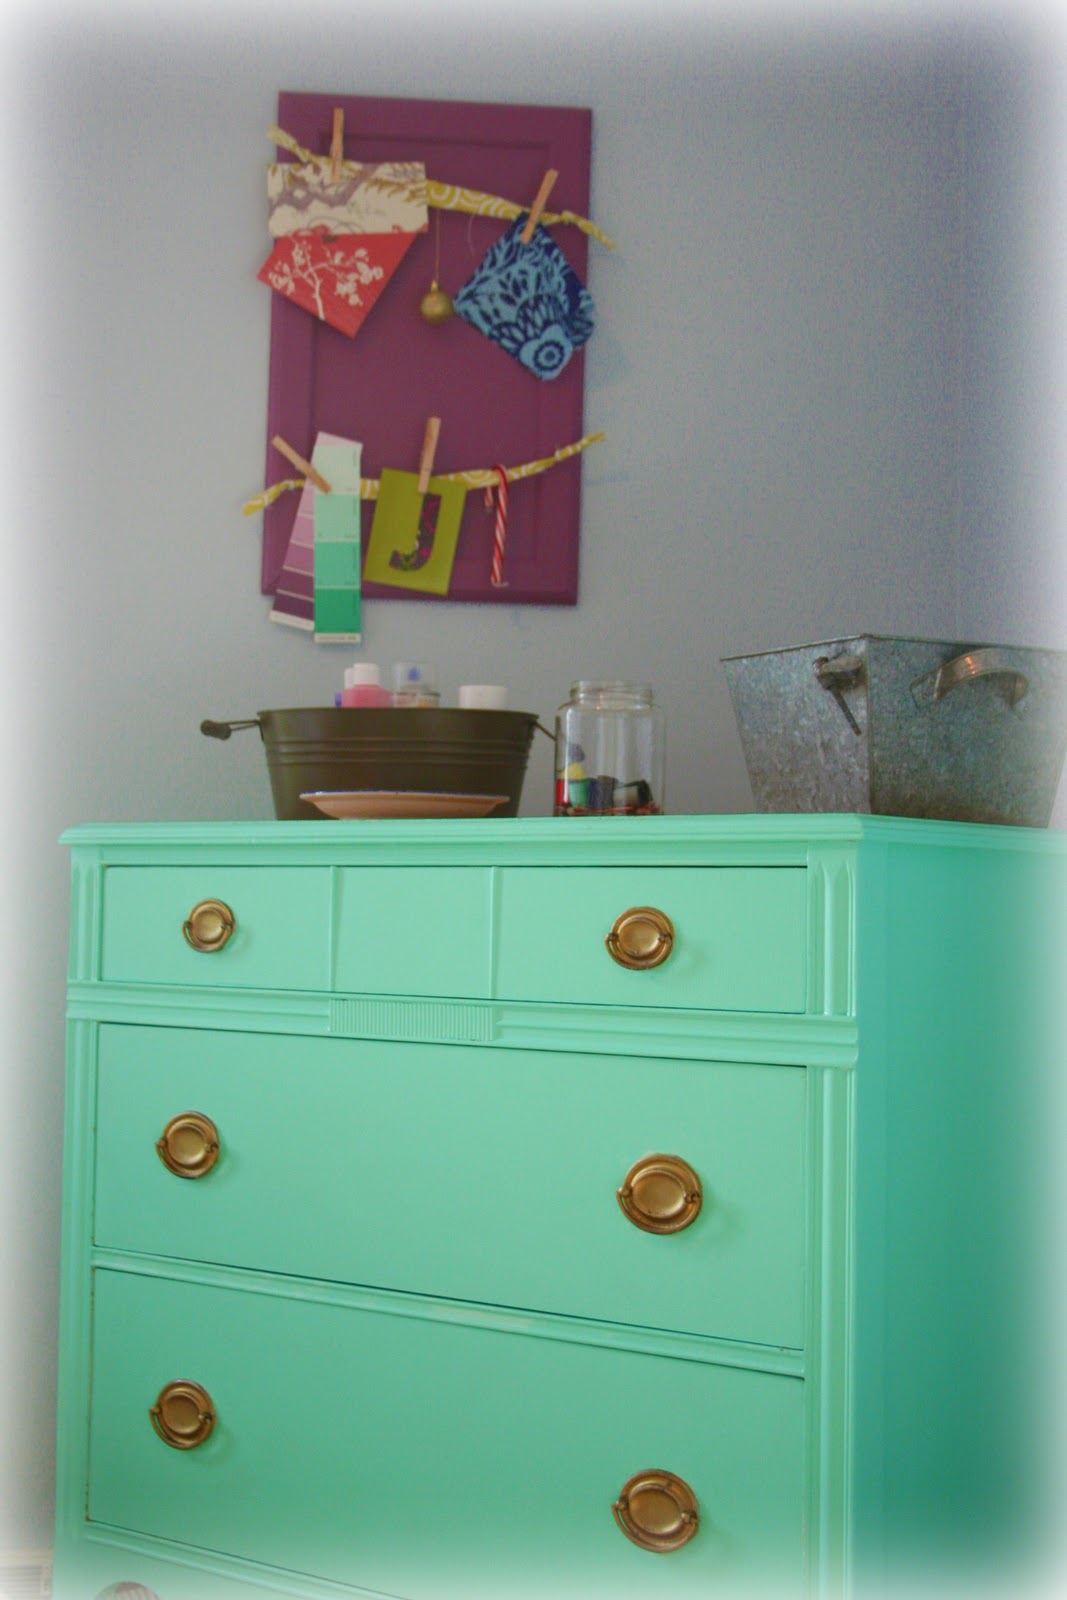
#8 The Dresser - I shared this beauty with you only days ago but just in case you have forgotten...read this!

OH NO!  I forgot to include the stencil.  OK, adding a #9 The Stencil - Ah the stencil.  The stencil that began it all.  The stencil that captures my heart every time I walk into the room...no seriously!  Read the complete how to right here

So that is it!  Please send me your question or comments below.  And share your room redesigns with me at missiondecorate.@gmail.com

Wednesday, December 7, 2011

Etsy Shop Of The Month!

It is time again for our Etsy Shop Of The Month!  And this one is coming to you just in time for the holidays!  If you keep reading you will find a 20% discount code to help you fill all that space under your tree. 

This month I present to you Jenna Sue Maps.  I came upon Jenna Sue while doing my own Christmas shopping and I fell in love.  Now I am not saying who the lucky winner is but someone in my family will be receiving a lovely map from Jenna Sue picked out just for them.  (I'm a little jealous and plan to order one for myself as soon as the giving season is over.)

From Jenna herself..."Hi there! My name is Jenna and I'm in love with all things decor & design related. This shop is a division of my main etsy shop - jennasuedesign.etsy.com (which you must see) - devoted to Custom City Maps. My collection grows with every custom map order, so check back often!

Jenna is also a blogger just like me and really creates beautiful things.  Check out her blog here.

But now for a sneak peak of Jenna Sue Maps.  Let's start with my personal favorite, San Francisco...

San Francisco City Map Art Print / Choose your City & Color / 8x10

Maybe a little Madison...
Madison City Map Art Print / Choose your City & Color / 8x10

Why not Marrakesh!

Marrakesh City Map Art Print / Choose your City & Color / 8x10

Yes, she has every city you could imagine.  And if you don't see a map for, I don't know, Rifel Colorado then she will make it for you!  Jenna will also let you upgrade to a larger size and select your background color. 

They really look great as a stand alone piece or cluster a few together for an amazing gallery wall!

And to make the amazingly priced pieces even sweater Jenna is offering Mission Decorate readers a 20% discount!  Just enter the following discount code at checkout...BLOGSPOT20.  Wow, thanks Jenna you rock!