Tuesday, February 12, 2013

Put Your Mouth Where Your Pin Is

You are all Pinterest junkies like me, right?  One of the many things I love it for is recipes.  I pin myself a boat load of recipes.  Now I will say they are not always a success, but I think that is true with many recipes sites and cookbooks so no fault to Pinterest.  But the thing is you never know until you try.  So I am trying to actually make some of those millions of recipes I have pinned.  What a concept...I know.

So this week I am trying out three recipes.  I have not yet tried them and they may be a hot mess but they all look so yummy that I think any fails may be the fault of the chef not the authors.

The first I am trying is in honor of my husband, the no-bean eater.  Beanless Beef Chili was a pin from a while back but actually comes from The Food Network.  And since I seem to be living in the Arctic I thought chili sounded perfect.  So here is the recipe copied straight from here.

Picture of Beanless Beef Chili Recipe

Ingredients
2 tbsp. canola oil
1 (2 1/2-pound) beef chuck roast, cut into 1/2-inch cubes
2 medium chopped yellow onions
1 tbsp. chili powder
1/2 tsp. red pepper flakes
1/2 tsp. cinnamon
1 small chopped jalapeno pepper
1 tbsp. chopped garlic
1 (28-ounce) can chopped tomatoes
1 cup beef broth
Kosher salt, to taste
Black pepper, to taste
SPICED SOUR CREAM:

1/2 cup sour cream
1 tsp. chili powder
1 tsp. lime juice
1 tsp. hot sauce
2 scallions
2 tbsp. chopped fresh cilantro
Directions
Put a deep heavy-bottomed pot over medium-high heat and add the oil. Put in the beef, season with salt and pepper, and cook until it is well browned, about 10-15 minutes. Remove the meat to a bowl with a slotted spoon and discard the fat from the pan. Pour half the broth into the pan and scrape up any browned bits.

Pour this into the bowl of a slow cooker. Add the onions and put the meat on top. Add the chili seasoning, red pepper flakes, cinnamon, jalapeno, and garlic.

Add the tomatoes with their juice and the remaining broth. Cover and cook on low for 4-6 hours. Taste, and adjust the seasoning. Serve garnished with spiced sour cream.

The next recipe I am going to try out are Chicken Gyros.

Chicken Gyros with Tzatziki sauce

Don't they look awesome!  This recipe is from a blog called Basil.  (Love that name!)  And you can find the recipe here.  Or right here...

Chicken Gyros

2 chicken breasts, cut into strips
1/4 cup olive oil
2 tablespoons lemon juice
2 tablespoons garlic, chopped
1 teaspoon oregano {dried}
1/2 teaspoon cumin
1/2 teaspoon onion {powder}
1 teaspoon salt
  • In a bowl or bag, place all of the ingredients together and mix well. Marinate for up to 2 hours.
  • Once ready, place the chicken on a grill {I use a George Foreman} or in a pan and cook for about 3-4 minutes per side.
Tzatziki Sauce

1 cup cucumber, finely chopped
1/2 cup greek yogurt
1/4 cup sour cream
1 teaspoon mint
1 teaspoon cilantro
1 tablespoon lemon juice
1 garlic clove, minced
1/4 teaspoon salt

  • Mix all of the ingredients together and let sit for at least 1 hour before using.

Condiments:
pita bread
lettuce
tomatoes, sliced
red onion, thinly sliced
tzatziki sauce {recipe above}

  • Take a piece of pita bread and layer with the lettuce, chicken, tomato, red onion and tzatziki sauce.

And last but not yummy least is Greek Yogurt Blueberry Banana Bread from No Sugar Sweet Life.

Greek Yogurt Blueberry Banana Bread.


Ingredients

1 1⁄2 cup
 Whole Wheat Pastry Flour
3 tablespoons
 Whole Wheat Pastry Flour
1 1⁄2 teaspoon
 Baking Powder
1⁄2 teaspoon
 kosher salt ((optional))
1⁄2 cup
 Brown Sugar (or 1/4 cup agave nectar)
1 teaspoon
 Vanilla Extract
  Large ripe bananas
  Eggs
6 ounces
 Chobani Vanilla Greek Yogurt (or Blueberry)
1 cup
 Blueberries (fresh or frozen)

Instructions

  1. Preheat oven to 375 degrees.  Start by combining flour, baking powder, salt in a large mixing bowl.
  2. In a separate bowl, mash bananas with a fork until they are gooey and liquid-like.
  3. Add eggs, vanilla and brown sugar… mix thoroughly.
  4. Add greek yogurt
  5. Whisk until everything is well combined and there are no lumps.
  6. Pour the wet ingredients into the dry ingredients, and mix until just combined.  At this point, fold in the blueberries.
  7. Pour batter into a greased loaf pan and distribute evenly.
  8. Put into the oven and bake for one hour, or until the top is golden brown and a toothpick comes out clean.
  9. Transfer to a cooling rack and (try to) let the bread cool for at least ten minutes before slicing.
Yeilds 12 Slices

Sunday, February 10, 2013

Goodbye Blogger, Hello Wordpress

So I have made a big blogging decision and I am kinda scared.  This may mean absolutely nothing to non-bloggers, so I apologize if this doesn't compute but I am making the big switch.  Bye bye Blogger...hello Wordpress!

Let me start at the beginning.  When I first started Mission Decorate I knew nothing about writing, designing, maintaining, all that stuff about a blog.  And for me Blogger was the perfect home.  First of all it is free.  And how was I to know that 306 posts later I would still be doing this.  (Let me say I did purchase my domain name right away, which is why I don't have "blogspot" in my URL.  Which I HIGHLY recommend doing if you are starting a blog and the name is available.  It is maybe $10 a year.)  Blogger was also a good decision because it is very straight forward and easy to figure out on your own.  It has served me very well.

But what began as a side project has grown into something I love, dedicate a lot of time to and truly wish to grow.  And that is why it is time to say goodbye to Blogger and take the Wordpress leap.  There are endless reasons why people prefer Wordpress to Blogger or vice-versa and I am not about to claim to be an expert, but I will say my main driver is design capabilities and plug-in options.  But if you want to read more I thought this post from The Painted Hive is very well written.  I also like this list of pros and cons from Lovin' From The Oven.

So once my decision was made to make the change I then had to decide how I was going to do it.  It is very possible to do this conversion yourself.  There are actually great e-books out there that walk you through it, like this one from Addicted to Blogging.  But in addition to the conversion I was also hoping to get some design help to change the look of MD.  And that is why I decided to seek out help.  I researched high and low, in every price range, offering every service and made the decision to work with Stephanie at Dirt and Lace Designs.

It may sound silly but just committing to someone has been stressful.  Mission Decorate is my baby that I have built from the ground up and it is hard to hand it over to someone even if it is just for a day or two.  And one of the most redeeming qualities about Blogger is that I know how to use it!  I have no idea how to use Wordpress.  I have watched videos and it looks pretty straight forward but eek.  I am pretty computer savvy and I know I will figure it out but it is still scary.

Now I still have some things to do before the big conversion can get started including selecting a host (which is why Wordpress is not free).  But I wanted to keep you all in the loop because although this wont make a big impact on your Mission Decorate reading (hopefully the site wont be down at all during the switch), it will make a big impact on my Mission Decorate writing.  So wish me luck and I will keep you posted on the progress.

Friday, February 8, 2013

Art Activity Of The Month Club

Back in October I introduced you to my friend Kerrie in this post.  Well in January I received this email from her...

Hi Mamas,
Happy New Year! As the weather keeps getting colder, I am realizing there will be quite a few days where we will be inside and searching for something new and exciting to do. A while back I saw an ad for an art activity of the month club where you subscribe and each month they send an art project in the mail. It was pretty expensive though and another friend had the idea of getting some moms together and doing it on our own. I thought of each of you because of your child's age and the possible interest in something like this. There is absolutely no pressure to do it.
What it entails:
Sending an art activity to each person on the list on your designated month (probably 2 times per year).
You can be as creative as you want. You can come up with your own project - you just need to send everything the person would need from the glue to the tape so that once they get it in the mail they can get started. Or you can buy an art project kit from the store and send it. It will be some work on your month, but the other months you can just sit back and wait for a fun project to arrive in the mail.
Depending on who is interested the projects will need to be geared towards 2-6 year olds.
Again, no pressure, but if you are interested send me an email with your address.
I will organize the lists, send out reminders and will be in charge of the January project (coming soon!).

Kerrie 

Um, hello, brilliant!  So you know I jumped right on this!  Kerrie assigned months and put together the address list as well as sent out the first craft.

We got our craft in the mail and I set it aside.  But then a couple of weeks ago we were trapped inside in a huge snow storm (kinda like today, actually) and pretty much driving each other nuts.  And I cannot tell you how happy I was to have that craft all put together and ready to go.  My daughter and I spent the afternoon making popsicle stick frames and snowflakes and it was so much fun!

So I wanted to share this idea with you as I thought you might just want to put together an Activity of the Month Club yourself.  And I also wanted to give a big shout out to Kerrie cause this is just brill.   

Thursday, February 7, 2013

Grown-Up Valentine

Dear Husband, if you have opened this post STOP NOW, shut your eyes and back away from the computer!  

OK, now that that is taken care of...I wanted to share the really fun grown-up Valentine I have made for my husband.  And as I have shared in the past, Valentine's Day is not only love day for everyone but it is also my husband and mine dating anniversary.  Yup, this February 14th my man and I have been in love for 12 years.  WOW!  So I wanted to come up with a Valentine / Anniversary Gift that wrapped all that up in one.  And I think I did it with this card / art I made at PicMonkey.


As you can see the background is a map of Colorado featuring Boulder,which is where my husband and I met.

I printed it on glossy card stock and plan to frame it.  From there I'm thinking it would look great in our upstairs family gallery wall.  But of course it is his gift so he can put it were he wants.  (Stop laughing, that is kinda true!)

This is also an easy idea for just a card (doesn't have to be framed).  So if you want to make one yourself follow this link to my PicMonkey Card How To.  And where did I get the map?  Google Images!

Wednesday, February 6, 2013

Two Steps Forward, One Step Back Or Something Like That

Remodeling projects, no matter how simple they seem, are ever well...simple.  In addition to the light fiasco, we also purchased a new faucet, knobs and mirror for the main floor bathroom.  The fixture arrived and we tried to install it this morning but of course it did not fit.  So we boxed it back up to ship it back and went to Manards (the Mid-West's version of Home Depot.  We have Home Depot too.  I mean we aren't barbarians.)  And actually found something that looked good and actually fit.  I guess the "fitting" part is crucial.  So that was one step back and then one step forward.


Hubs working hard to install the new faucet...


Sorry ladies, he is all mine!

We also bought new knobs for the bathroom cabinets.  And those were a slam dunk the first time out the gates.


So we will call that one step forward.  (Or do two knobs count as two steps?!?)


Next we splurged and ordered this awesome mirror from Pottery Barn.

Kensington Pivot Mirror, Regular, Antique Bronze finish

It also arrived this past week but when we went to install it this morning it had a crack.  Booooooo!  So one more step back.  We called Pottery Barn right away and they will have another one in the mail tomorrow.  I was hoping to get some kind of credit or discount on my next purchase since the crack sets us back at least a week.  But after consulting with her supervisor the woman on the phone said "Let's get the mirror shipped out to you.  Make sure you are happy with it and then we can address your request."  Translation - we are expecting that you wont take the time to call us back in a week when you get the new mirror so hopefully we will get out of this without giving you anything.  Lame-o!

So the status is we have a new faucet and knobs and we are waiting on the new light and mirror to arrive.  And that officially takes the tally to one step back...one step forward...another step forward...and a giant mirror step back.  As I said, never simple!

Tuesday, February 5, 2013

Easy Valentines

"Love Day" as my daughter calls it, is right around the corner.  And for us this is our first year of having a class to give Valentine's to!  Now my daughter only has 8 kids in her class so the idea of making our own Valentines isn't that overwhelming.  I understand it may be a bit different if your kiddos have 25 kids in their class.  But this is a really simple project that you can get the kids working on and you probably have most of what you need already at home.  


All you need is paper or cardstock, yarn, a hole punch and pens or crayons or stickers to decorate with.

Start out by making a heart template out of paper.  Fold a piece of paper in half, cut half a heart and open it up to have a full heart...you know how to do that.


Next use the template to cut out hearts.  You will need twice as many hearts as Valentines you want to make.  I cut 16 hearts to make 8 Valentines.


I used paper I already had in my craft supplies and decided to do solid paper on one side and a print on the other side, but this isn't necessary - just use what you've got.  You could even use paper bags or wrapping paper or gift bags.  This is a great project to recycle stuff around the house!


So now that you have cut all your hearts, put two together and start punching holes.  Do not punch holes in part of the top of the hearts because this is where you want to leave it open to create your pocket for candy or other little goodies.

Cut a long piece of yarn and lace it through the first hole and make a knot so it wont go anywhere.


From here let your kids take over.  My daughter loves her lacing game and that is all this is!  


Actually, her version looks more like this...


Tie off the yarn at the end and start decorating.  


You can write the kids name's on the Valentines, decorate with stickers or glitter or anything you would like.  Fill the Valentines with goodies and you are ready for Love Day!


Monday, February 4, 2013

Failure With Enthusiam

Success consists of going from failure to failure without loss of enthusiasm - Winston Churchill

Well, it is true - I failed.  But as Mr. Churchill suggests I have not lost enthusiasm, instead I gained some knowledge and even some confidence.  So what did I fail at?  The light.  The bathroom light I recently told you about.  No, I did not burn down the house.  As a matter of fact the confidence I gained comes from the really good job I did installing the light.  It turns out it was just a bad design choice.

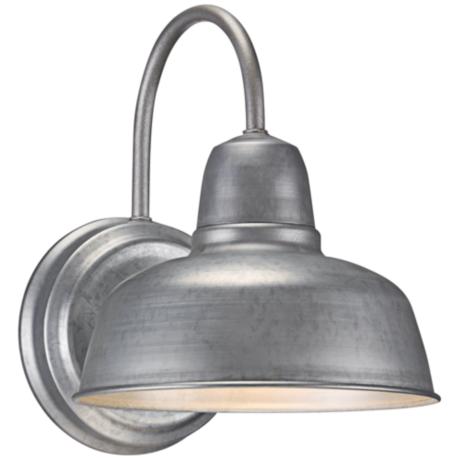
You see, I am not thrilled by the basic 2 or 3 bulb vanity lights.  The design just doesn't appeal to me.  So I reached outside the box by ordering this galvanized outdoor light from Lamps Plus.  

Barn Wall Urban Galvanized Outdoor Wall Sconce


And I still love this light.  But see here is the problem.


No, I didn't lower the ceiling and cut off the top half of the room...that is the lights doing.  I mean it is obvious now.  A light bulb with a non-translucent shade aiming straight down well gives you light shining straight down.  Darn it.  And no, there is no other light in the room so it just doesn't work.

So it may go back in the box to be shipped back to Lamps Plus or we might just keep it because we really do like the light.  We shall see.  But in the mean time I made a new purchase and although it is exactly what I didn't want I have come to the conclusion that function sometimes needs to out way form.  And it doesn't hurt that I found something I actually really like.


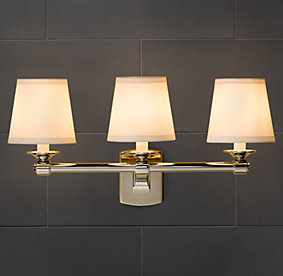
It is almost 3 times more expensive then the first light (uggg) but it will look fabulous, especially with the other fixtures we ordered (that just came in yesterday!).  So the Campaign Triple Sconce from Restoration Hardware won out in the end.  And at the very least now I know how to install it when it arrives!

Friday, February 1, 2013

Pretty Box

Isn't it funny where our inspiration comes from sometimes?  I was shopping with a friend (Hi Anna!) a few weeks back, actually getting everything she needed for her daughter's birthday party and we were snooping around the dollar bins at Target for goodie bags.  (Don't you love those dollar bins that they sneakily put right at the front of the store so you can't help but stop and look.)  And we found what we needed but I also spotted this...


It is wrapping paper, but don't you just love the pattern.  And it was one dollar.  Now I had no idea what I was going to do with it but I loved it so I bought it.  Correction...Anna bought it.  I had no cash and was to embarrassed to pull out my credit card for a $1 purchase.  Now don't get me wrong, I would have done it but she was already buying a bunch of stuff so I suckered  her into buying it for me.  (Don't worry, she earned good karma for it which you will see if you keep reading.)

A few days later while on a shopping trip to JoAnn's I picked up this box for about $4 I think


and a bottle of matte Mod Podge.  Which, by the way, I thought was Modge Podge until I did this project a while back.  I followed the tried and true rules that I found on this website when attempting my first Mod Podge project and I think it came out looking pretty snazzy.  Oh yeah, I said snazzy!


And I added some robin's egg blue to the inside with paper I found at Michael's.


So now you are wondering about this karma thing.  Well, as I type the finished box is in a gift bag sitting on Anna's front porch.  There is nothing better then giving pretty things to wonderful friends.  (A wonderful friend who buys you dollar bin goodies!)