Friday, July 29, 2011

Filling the Shelves

Months ago, when working on the Grand Piano Room, I put up these shelves.  Three white floating shelves from Target.  I immediately filled the top two shelves with fun do-das.  But the small shelf was not so simple. 


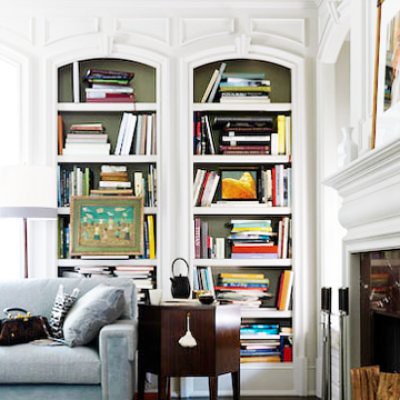
For our wedding we received a lovely Crate & Barrel orange vase (my husband swears it is red... SWEARS!) and I knew it would be the perfect size for the smallest shelf and bring a fun pop of color.  But there was one problem...the vase had been lost in the abyss that is moving.  You know what I am talking about, every time you pack up and move things disappear.  And no matter how many times you swear you packed it in the box with the frames or the dishes or the books it is not there.  Well, that is where my vase was...missing!

So after weeks of an empty shelf I decided it was better to fill it with something then leave it naked for the whole world to see.  (Yes, the entire world is looking at the shelf in the corner of my Grand Piano Room.)  So I filled it with this...


...my daughter's Easter toy.  At the very least I thought it would get a few laughs.  And this is where problem number two arrives...NO ONE LAUGHED!  Now this is a mystery I am still trying to figure out.  Did they not laugh, or even comment, because 1. they didn't notice or 2. because they thought it was a real decorating choice and didn't want to hurt my feelings.  Either way it is ridiculous!  And let me point out it is the end of July and I put the chick up in April!

So now I am thinking that all my hard work goes unnoticed to my house guests when all of a sudden my husband points out that there is one more box in the basement that was never unpacked.  WHAT!?!? (Picture shinning lights and heavenly music.)  The box of our China was never unpacked and I bet that little vase is hiding in there!  And it was!  I dug through all the China and found my beautiful little orange friend.  (Not Red!)


So although two truths have been revealed, that either my friends and family actually walk around my house with their eyes closed or they secretly think I have a thing for wind up chickens, my little shelf has been filled and my heart is content.  (Yes, that is all it takes.)    

Wednesday, July 27, 2011

Reupholstered Seat

On the very first day my mom and I set out to hunt for furniture for her new Grandma Apartment we found this...


... the perfect spot for the granddaughters to play with jewelry and cover themselves in makeup.  But we both agreed the seat needed to be reupholstered, so that is what I did!

Reupholstering can be very simple and in this case it was.  I know many of you have done it before but for those of you who are upholstery newbies let me quickly break it down.  Pull it apart, wrap it with new fabric, staple.  What...you want more details...OK.

So this is what I started with.


I flipped it over and removed a few screws.


And had this...


I pulled off the striped fabric.  Now this is not entirely necessary.  I could have worked right over it, assuming my new fabric was thick enough so nothing could be seen thru.  But in this case it was easy to see that the striped fabric was also a reupholster job and there was something hiding underneath that I just had to see.  And this is what I found, a sweet purple checked pattern...


...but still not what we were looking for so I continued.  I ironed the new fabric.  (Please take the time to do this.  There is nothing sadder then putting in all this work to only have a big crease going right down the middle of the seat.)  And then cut a square large enough to cover the surface and wrap around the back on all sides.  Then just like we did for the upholstered headboard, wrap and staple.  It really is that easy!


I had to be sure to not pull the fabric to tight otherwise the sober lines in the pattern would have turned out more like drunk lines.  But other then that it was simple.  And now my mom has a beautiful seat to match her beautiful headboard to entertain her beautiful granddaughters.  (I don't know what we will do if any of us ever has a boy!)


This post was shared on...


IhookedupwithHoHlamespice

Beyond The Picket Fence

Monday, July 25, 2011

Ms. Stewart I Expected More!

Dear Ms. Stewart (Martha to her close friends),

We have never had the pleasure of meeting.  I am not a viewer, a reader or a long time follower.  (I know... a great way to start off a letter.)  But recently I had my first encounter with one of your products and it was a total fail

I have been working on some old kitchen cabinets which I am trying to turn into something more and I wanted to try a crackle technique to give them some character. 


I was planning on following these directions but when I got to Home Depot I was informed that they did not have crackle medium but they did have this...


Martha Stewart Paintable White Crackle.  I was quickly sucked in by the pretty label and bright container (just like I am sure was planned) and I bought it.  As instructed by the directions on the back I also bought a putty knife for application.  I saw that it instructed me to apply the crackle over Martha Stewart Primer.  But seeing as how I had already sanded and primed the cabinets I figured I was good and was not about to be sucked into the "you have to buy my product and my product only" scheme.

So I got home and went right to work starting with my nicely sanded and primed cabinet.


I applied the Martha Stewart Crackle as instructed and let it dry over night.  But when I came back in the morning all I had was this...


Um, I am no crackle expert but this is not crackled AT ALL!  A total and complete FAIL

Needless to say, I am disappointed in our first adventure Ms. Stewart.  I was expecting so much more!  Or at least a little more...but I got nothing!  A perfectly good $6 down the drain.  Bummer. 

So now I go back to the sander and hope there is no permanent damage to the cabinet.

With Disappointment,

Jill at Mission Decorate

Side Note: I did not actually send this letter but if you have an address for Ms. Stewart please let me know!

Friday, July 22, 2011

Bye Bye Armiore

I wanted to get rid of this...


So I took this...

Added these...


And now I have this!!!

And this!!!


Side Note: That was an entire post in 20 words.  That has got to be some kind of record!

This post was shared on...


Tuesday, July 19, 2011

He Must Think I'm Crazy!

I am a very lucky woman.  I have an amazing husband who makes me smile, laugh and enjoy every day...but honestly he must think I am crazy.  When he left the house this morning all was calm (well as calm as it can be with a 1 1/2 year old on the loose).  But when he comes home tonight he will be welcomed by this...


I mean it shouldn't be a total surprise.  About a month ago I whizzed a color sample past his face, while I am sure he was doing something more important, and said "do you like this" and I am certain somewhere in there I heard a "sure".  I mean come on, that is a green light for painting if I have ever heard one.  Right?!?!?!

But there are some benefits to my unpredictable behavior.  He regularly gets out of  jobs around the house.  Well actually that is a lie.  In truth what really happens is I start a project like this on a whim but can only complete 85% of it on my own (now note the large piece of furniture that I cannot move on my own and of course need help to untangle all the wires behind it) and then he gets roped into helping me finish up the rest.

See...he must think I am crazy!  But hopefully there is a tiny piece in their that also loves me for this insanity.  Oh I really hope!   

Monday, July 18, 2011

To Do to Done

Vacation is over...sigh...and it is time to tackle my ever expanding to do list.  I have been walking around with this list cluttering up my head so it is time to put it on (blog) paper.  So here it is...

Master Bedroom:

- Find bedside table to refinish / paint / have some fun with.
      I found a great option for $12 the other day on Craig's List but apparently I wasn't the only one who wanted it and seeing as I was a 6 hour drive away on vacation I lost out.  Total bummer.  So my search continues.

- Move art.
      You may remember this art work I made when I did the surprise Master Bedroom makeover. 


Well, we decided to move the TV back into our bedroom so now it looks like this...


So I think I better move it to a different wall! 

- Put shelving in hubby's closet. 
       When we added the sewing machine / bedside table we instantly agreed that the armiour had to go. 


It is part of the lingering furniture from our original bedroom set that is slowly falling apart.  To make up for the lost storage space I am going to add shelves to my husband's closet so he can keep his clothes perfectly folded (cue the laughter).

 Family Room:

-Paint accent wall.
        The paint has been selected and purchased.  The necessary tools are in the garage.  Now I just have to dig up some motivation!

- Paint / distress cabinet wall art.
          I bought these cabinet doors at The ReStore and I have big plans for them.  The rest you will have to just wait for :)


- Hang new art!
               I bought a couple of great pieces of art on our vacation and I can't wait to hang them in the Family Room.


- Built-in bookshelves
              Now this is a bigger project that is still in the planning phase but my intention is to build or buy bookshelves to create a built-in look in the corner of the Family Room.  I have been reading up on my options but have yet to make a decision on which route to take.  But here is a little of my inspiration...


So that ladies and gentlemen is the current list running through my brain.  The hope is that now it is out there in the blog stratosphere I will feel pressure to get it all done.  Wish me luck!

Wednesday, July 13, 2011

Door County, Wisconsin

How many of you are saying "where" right now?  Well "where" is where I am right now.  Door County is in northern Wisconsin and is a peninsula with Green Bay to the west and Lake Michigan to the east.  It is claimed to be "the Cape Cod of the Midwest".  (No, I did not come up with that but I sure wish I had!) 

Door County is made up of adorable beach towns and charming but quirky vacation rentals.  For the second summer in a row my family...husband, daughter, brother, sister-in-law, their 2 kids and my mom...have spent a week in one of the charming but quirky rentals and that is where we are right now. 

One thing I love about Door County is the wonderful antique and homey shops.  (Homey like stuff for your home not homey like the clown, but he is pretty cool too.)  And today my sister-in-law and I did a little "research" while the kids napped.  We found two great spots!  Chelsea Antiques and Blue Willow Shop in Sister Bay, WI.  Here are some of the goodies we found...

At Chelsea Antiques these amazing vases caught our eyes.   


You pour water in the center and fill each hole with flowers!  I also loved their lamps.


I could fill my house with lamps like this (if I could afford them)...


Blue Willow Shop had wonderful frames that caught my eye.


I am thinking of going back and getting a few of these.  I mean everyone needs a vacation souvenir...


I also loved this guy.  Need I mention that bacon is a staple in the Wisconsin diet which I try to avoid daily.

So if anyone needs me I will be lounging on the beach through the weekend.  And most likely hitting up a few more homey shops.

Monday, July 11, 2011

Asking For Help

I have always been very independent and I am proud of that.  (I am also very proud that my daughter is completely the same way.)  And that independence is part of what drew me to DIYing.  I love coming up with an idea and just doing it.  Figuring out what I need, how to make it and executing it on my own.  There is no reason to be slowed down by cash (or lack of it) or know how because you can figure out a way to do everything within your budget and the DIY blogging world out there has made finding instructions for almost anything so easy.  But...and you knew there was a but...I seem to always come to a point in my bigger projects where I just need help.  And to be totally honest this really frustrates me

Sometimes I can't figure out the cuts or angles.  Sometimes I can't get something to work the way it should.  And sometimes I just have no idea how to use something.  I want to be able to complete the project now but something is standing in my way and I have to wait for help.

Here is an example...as you know I have been working on a headboard for our master bedroom.  I have done everything start to finish including buying materials, staining & painting the wood, sanding and measuring but when it came to the final step of putting in the brass nails I just couldn't get it right.  And the more I tried the more I was ruining it...


They just wouldn't go in straight.  I had one hour while the baby napped and I wanted to completely finish this project but no such luck.  I had to put on the breaks and wait until my husband could come home and help me.  Now don't get me wrong, I love that he is so willing to help and for the most part always fixes the problem.  But as you may remember I am independent and I don't want help!

My wonderful husband was able to save the day and the nails look great.  (Thank you honey!)  But I have to say I am just waiting for the day when I can complete a big project start to finish all on my own.    

Now is this just me?  Does anyone else fight with this or something similar.  It would make me so happy to know I am not the only one out there so even if you never have any issues with your projects maybe make something up just so I feel better...please!!!

Friday, July 8, 2011

Repurposed Wood Headboard

Ever since the fateful day when our bed broke I have been on a mission to create a new headboard.  And during my most recent trip to the Habitat for Humanity ReStore I found exactly what I needed to get the project started...four extra wide, dark stained floor boards that were in great shape.  I paid a whopping $4 for all four, brought them home and got right to work.


And after a couple of weeks of work (mostly spent waiting around for paint to dry in the humid Wisconsin weather) I had created this...


A wonderful, if I do say so myself, repurposed king size wooden headboard for a grand total of $37.85!


So how did I do it?  Let's see...I started out with the 4 boards you see above and cut them down to size -80 inches (the length of a king size bed).  For the correct height (32 inches) I needed a little more wood.  Luckily I had a 1"x11" board in the garage, which combined with the other 4 boards made exactly 32 inches.  I stained this board to match the others and then I was ready to go.

Next I painted all 5 boards with two coats of white paint.  After the paint thoroughly dried (very slowly) it was time for some distressing.  Distressing is totally fun mostly because you can't mess it up.  Just make it look old!

To distress these boards I used the sander and fine grain sandpaper.  I took off just enough white paint to let the dark stain come through in spots and it turned out great.


Next I lined up the boards flat on the garage floor and cut two 1"x 5" boards to hold everything together.  I put a few nails through each board from this side to get things started.  (BTW - I am seriously considering asking Santa for a nail gun...so lady like!)


I flipped it over and put in the fancy copper nails.  And actually I have to pause here to make a budget note...the copper nails were the big "investment" in this piece.  The box of nails was $13.98.  Now I included this entire amount in the total I listed above but in reality I only used about 20 nails so if I was being technical I could drop the total spent down by about $10.  Actually that sounds pretty good.  OK new total...$27.85!  Oooh, I like that!


The copper nails were very soft so in order to get them in straight I pre-drilled holes (my husband's brilliant idea) but this did mean they weren't very functional so at this point I went back and added more ugly but functional nails form the other side. 


The final step was to mount my masterpiece on the wall.  I think the easiest way to do this is to use some of these handy brackets...


You can find them in the picture hanging section at ACE or most local hardware stores.  All you do is attach one side of the bracket to the headboard and attach the other side to the wall and they slide right into one another.  They even come with a cute little built in level!


So what do you think?  I am pretty excited about how it came together.  The bedroom is turning out to be an eclectic collection of recycled and reused pieces.  (You can see some of the other items here and here.)  Now I am on the hunt for another bedside table and two lamps.  Sounds like another repurposing project to me!   


This post was shared at...


The Shabby Nest