Friday, June 29, 2012

Shakin' In My Boots

You would think the writer of a home decor / diy blog is fearless when it comes to jumping into a new project.  Although I admit I am braver then most, there are still things that make me shake in my boots.  And in this particular case fear has kept really ugly window treatments on my walls for almost two years now.  Wow that is embarrassing!

I have told you about these babies before.


They are in the sun room and were left by the former owners...thank you for that.  They involve a lot of fabric and a pretty substantial anchoring system.  And to add insult to injury the rigging was screwed into the grass cloth walls.  


So all I could see in my mind where giant screw holes left behind in the very hard to match and patch grass cloth paper.  All this = me doing nothing.  


But today that all changed.  I got an itch to do something big.  Similar to the one that led to my husband waking up at 8am to the sound of me destroying a patio with a sledge hammer.  (That was several years ago in another house but it still comes up at parties.)


The problem with that "itch" is it usually leads to a mess, which is what you see going on above.  But the mess is totally worth it!  What used to look like this...


now looks like this...


The windows look huge, the grass cloth doesn't look so jungle and the holes in the walls aren't even that bad!


I even dragged the mess out to the garage and the room is for the most part back to normal.  All in a naps work.  


Now if you know me in the least you know the windows wont stay naked for long.  I have a plan to dress the windows back up (minus the jungle theme) and tie them into the rest of the first floor color scheme.  And I think I am going to be able to do it all on a pretty slim budget.  Keep your fingers crossed and I will keep you posted! 

Wednesday, June 27, 2012

Clean Up That Mess!

I was watching HGTV the other day (I know, shocker) and it was that show where they tell people if their renovations where worth the money.  Anyways, the kitchen they were looking at had a desk space and the designer said "Don't put a desk in the kitchen.  All it does is get filled up with piles of junk."  You know what, I have no idea what she was talking about.


OK so in truth my reaction was partly embarrassment, part relief that it wasn't just me and part "Nice! I have the builder to blame for my mess, not me!"  But any way you look at it I knew it was time for a fix. 


(Does it look any less messy in PicMonkey "HDR")


And just when this mess was about to eat up my desk entirely Marshall's to the rescue!

Hold on, quick tangent...I love HomeGoods as I'm sure you all do.  But the closest HomeGoods to me is not close at all, probably a couple hours away.  But did you know Marshall's owns HomeGoods?!?!  And most good Marshall's these days are expanding their "HomeGoods".  Meaning they have an increasingly good section of some of those goodies you would find at a HomeGoods store.  So if you are as far away as I am from the real deal check out your local Marshall's and you wont leave empty handed.

But back to the messy desk - a walk through Marshall's the other day turned up this fabulous organizing gem.


Metal, three baskets, rustic / industrial feel, and the perfect solution to my disaster.  A couple of nails later and it was up on the wall ready to be filled.


A section for magazines, one for bills and the last for coupons.  All the perfect fit.


Five minutes of throwing things out, sorting, returning items to where they once came and filling my new storage and I actually remembered what the surface of the desk looked like.


Wow!  What an improvement!  And I only spent $20.  Gotta love Marshall's!

BTW - this made me think about how organizational projects often look so good at first but given a few weeks everything goes right back to being a mess so I thought I would show you what a couple of my other org projects look like at this very moment.

Do you remember the pantry project?  When it was first complete it looked like this...


And at this very moment it looks like this


Pretty happy with that!  It isn't going to stay perfect but the organizing I did really was functional (not just pretty) and it really has been working well for me.  Good job Jill!

Remember the shoe storage?


Let's see how it is looking...


Again, not perfect but it is working well.  If the wall was bigger maybe 3 more crates would do the trick to keep extra shoes off the floor but as long as I keep the not worn so often shoes in the bedroom closet the space works out great.

So the moral of the story?  Eat chocolate...oh wait that is the moral of every story.  But honestly taking the time to get things organized does pay off.  And as silly as this sounds, when it is not only organized but pretty I am that much more motivated to keep it looking good.  Hey...a little style goes a long way!

Monday, June 25, 2012

Time to Get Movin'

Tickets are booked, plans are being made, guests are on the way (at the end of July) which means I need to keep moving on the guest room redo.  It is actually more of a touch-up then a redo.  Wall color is staying the same, the main furniture is good, it just needs some style.

You may remember I started a while back with a gold themed gallery wall.


At that point I was planning on simple red accents and to be done with it, but as always that plan has changed.  And it changed because I found this fabric...


As you can tell from the first pic, this room is very dark.  It actually does not have a window.  When I saw this fabric I knew it would do wonders in brightening up the space.  So I bought it.  And now I am shaping the whole room around it!  

For the first step I did this...


Before I go any further I have to apologize for the colors in these pictures.  As I said, the room has no windows which makes photographing it a nightmare.  It is impossible to get good colors.  The first pic, of the fabric laying on the floor was taken in another room and really does capture the true colors.  Sorry for everything else!  But here is a better view...


The best part is how it all comes together with the bedding...NOT!


Look at that awesome color combination!  Well, needless to say new bedding is on the list.  Don't you love how one change makes it necessary to change everything else.  My husband especially loves that!  

But despite the horrible combination I love how the fabric looks on the wall.  It sort of acts as a foe window and maybe tricks guests into feeling the sunshine.  

I plan to make pillows with the fabric I have left.  I also need a spot for guests to put their luggage as well as some new accessories to compliment the new color palate.  I have one month to make it happen so I better get moving!  

Thursday, June 21, 2012

Do You PicMonkey?

I love to make pretty things and I love to make things pretty!  One great way to do that is through photography.  And the new photo editing site PicMonkey makes pretty so easy.

PicMonkey (as I have mentioned before) is my new replacement for the ever so loved but bought out by Google and closed down, Picnik.  PicMonkey is still pretty new and is adding more fun daily.  And for now all PicMonkey features are FREE!  I say "for now" because I don't think that will last forever.  But if it is similar to Picnik the basic functions will remain free and the fancy stuff will be offered at a very reasonable and totally worth it price.

So why am I telling you all this?  Well, in addition to all the fun photo editing features that you will find on PicMonkey it is also very easy to use to make great Printables!  I have talked about Printables in the past and shared how to make them on Picnik, but now that Picnik is gone I thought I would share how to  do it in PicMonkey.  So let's get started.

This past week I made two really fun gifts using Printables.


The funky daisy is just for this pic because I thought maybe my friend would want to control her sons internet exposure seeing as how he is only a few weeks old.

The first (on the left) was for my hubby for our 6th wedding anniversary.  Happy Anniversary Baby! This one was super easy.  And is a good way to explain the basics...


If you want the full text I have put it at the bottom of this post so keep on reading!


Start out by opening a blank document in whatever paint program you have on your computer.  Then save that doc.  Go to PicMonkey and upload the blank document as a picture.

If you would like to rotate the picture to vertical or landscape go to the "basic edits" which is all the way on the left of your screen and the icon looks like a jack - OK I know it is not a jack but it looks like the jacks I used to play with when I was a kid.  Click on "rotate" and do what you like.

Using that same left hand side menu click on the "P" which is the text editing.  Pick a font and start typing in the box.  Once you are done typing hit "enter" and the text will appear on the photo.  You can then adjust the size & color of the text.  So easy!

The second Printable I made was only slightly more complicated, only because I broke the text up into several text boxes in order to use multiple fonts and colors.


All you have to do is type one section, "enter" and move that section to where you want it and adjust the size & color.  Then repeat.

If you want to add a picture go to the "overlays" tool - looks like a talking bubble.  You can either select one of theirs or if you want to add your own click on "Your Own" and you can use a picture from your own computer.

Now I have to confess...there is one thing I have not yet figured out how to do in PicMonkey (which I knew how to do in Picnik) and that is change the background color.  I have e-mailed PicMonkey but haven't heard back yet.  So if I do hear back I will let you know.  OR if one of you knows how to do it please share it in a comment below!  But you can use the "Textures" tab to create all kinds of cool textured backgrounds so try that out in the mean time.

And to delight you with a few more pictures.  Here are some of my before and afters using PicMonkey editing.

before...

after...


edits made: crop, lomo

before...


after...


edits made: crop, burst, frost, rounded corners
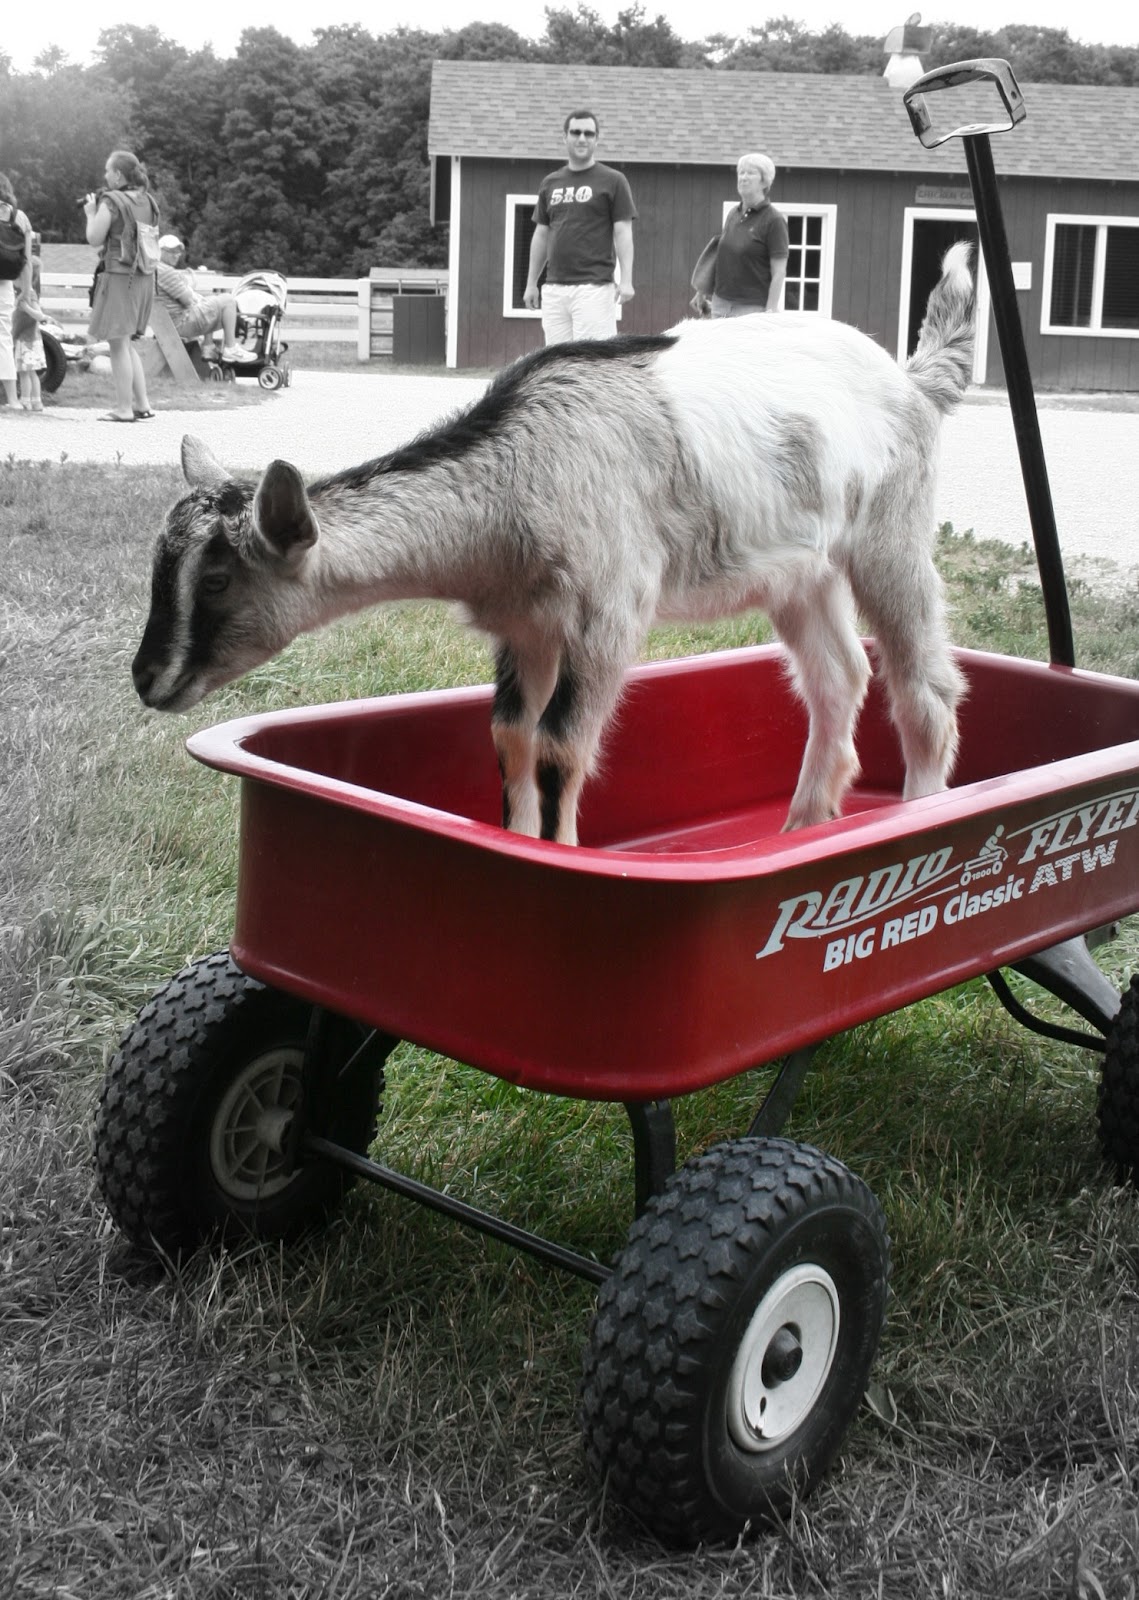
before...

yup, it is sideways

after...

edits made: rotate (duh), focal B&W   

So if you are looking to have a little photo fun or make your own Printables check out PicMonkey and share with us what you create!

And if you are wondering what the Irish Marriage Prayer says in the first Printable here it is...

May love and laughter light your days, and warm your heart and home.
May good and faithful friends be yours, wherever you may roam.
May peace and plenty bless your world with joy that long endures. 
May all life's passing seasons bring the best to you and yours.

Tuesday, June 19, 2012

What's In That Sewing Basket?

Is there a term for the stage before beginner?  Pre-beginner? In-utero?  Mildly terrified?  Well, whatever you call it, that is where I am on the sewing spectrum.  I have a sewing machine.  I have had one wonderful sewing lesson from my expert sewer Sister-in-Law and I have successfully made two things, both of which only required sewing in a straight line.  And even then my line wasn't so straight.  But I am trying.

And I thought by chance there may be a few others out there just like me who have grand dreams of sewing up a storm but don't even know where to start.  So...I thought I would share my itty bit of "getting started" knowledge with you.

Step One: Buy a sewing machine!
This step kept me in the pre-pubescent phase for awhile.  I feared that I would buy a machine and all it would do was take up space.  (And my husband was pretty much certain this is exactly what would happen.)  But with the help of a birthday gift from my mom I finally took the leap.


Now I am no machine expert but I will tell you there are a number of great starter sewing machines out there for around $100.  After some research I went with the Brother XL-2600i.  It was $75 from Amazon and I am super happy with it.  


It is simple to thread, light weight, and seems pretty durable.  It also has 25 different stitches.  Now I am not saying I have used any more than one of them but someday all 25 will come in very handy I'm sure.  


Step Two:  The other essentials
Don't think it is necessary to run out and buy all kinds of fancy sewing accessories, but there are a few things that I have found invaluable.  Just wait for a good JoAnn coupon and you can buy these goodies pretty cheap!

Sewing Scissors


Seam Ripper (I mean I never make mistakes, but you may)


Sewing Gage (for measuring hems!)


Pins and a Pin Holder (the magnetic kind is so handy)


A pretty place to keep everything!


Once you have all the starter goodies check out local spots for sewing classes.  For all you locals, Madison has a great spot called The Sewcial Lounge (with such a cute name) on Monroe Street.  They offer weekly sewing classes.  As well as "sew by the hour" so you can use their machines if you aren't ready to invest in your own.  And you can set up a "Sewcial Gathering" as a sewing ladies night.  "Sew" fun!  


And if you don't have something like this in your area...hello...business idea!!!!

Thursday, June 14, 2012

This Is Your Life

Happy Friday...you made it!  Before you take your victory lap read this for some inspiration because this is your life and we should all do what we love.


Wednesday, June 13, 2012

Free & Easy

Two of my favorite words are "free" and "easy" - and I only mean that in the cleanest, home decorating sense.  (If anyone thought otherwise, get your mind out of the toilet!)  OK, back on track...well today's project is both of these lovely words.  I started with something I already owned. I used some paint I already had.  And turned this


into this...

Ahhhh, both free & easy!  But to break it down into a few simple steps, I cleaned off the wood table which we bought years ago to go with a patio furniture set.

I painted on a coat of primer - gray tinted primer only because that is what I had and since I was using a dark paint color I new it would work just fine.


After letting the primer dry overnight I painted two coats of Benjamin Moore Ruby Red - allowing for drying time between coats.  I finished it off with a coat of Shellac to protect it from the elements.  


And that was that.  A fresh glass of iced tea (not spiked - it is only 11 in the morning) and I was sitting pretty with my new red table.


As this quick project demonstrates giving new life to something you already have can be an inexpensive (or free) way to DIY-ing yourself to a beautiful home!  Enjoy your day!

Monday, June 11, 2012

Get Crackin'

I know a to-do list post is not exactly sexy for readers but it is so helpful for us bloggers!  It not only helps us get organized and prioritize but putting a to-do list out in the blog universe helps us commit to actually get things done.  And yes even the best of us know how to procrastinate once in a while!

So thank you for indulging me...

On the top of my to-do list is the guest room.  We have lots of family coming to visit this summer (can't wait) so our guest room needs a little love!  Right now it looks like this


A total mis-match of who knows what!  But this beautiful fabric will hopefully point me in the right direction.


In addition to the fabric (which you will just have to wait to see what I do with it), the room needs more furniture - dresser, table, chair.  So I am planning of cruising Craig's List and local garage sales to find some great pieces that I can refinish to work in the room.

After the guest room comes the family room where we need a few more couch pillows - which is what this fabric is for...


We also need side tables, which I have some ideas on but have yet to find the perfect thing.

The dining room seems to keep getting pushed down the list but I have to finish it.  I have to paint, paint, paint.  Ugh, I am so unmotivated to do that!


And finally I am almost ready to tackle the sun room window treatments.  The plan is in my head and pretty soon it will be time to take the first step - take the old ones down and see what the heck is underneath...scared!


But now the to-do list is out there so I better get crackin' cause I know yall will call me on it if I don't.  You guys are intimidating!  Just kidding...but you are motivating!  Thanks!

Tuesday, June 5, 2012

Get To Spraying

I am SO excited for the week ahead!  My little girl and I are going to Boulder to see our besties!  Our week will be filled with kid fun, family fun and a whole lot of girl fun.

I have a bunch of projects in the works right now.  An adorable "welcome to the world gift" for Easton who joined his wonderful family June 1st.  Can't wait to meet you little man!  My dining room is still 1/4 painted.  I also have plans for sprucing up the guest room before all kinds of family arrive in July.

But this week that is all on hold.  My daughter and I will be hitting the skies and enjoying beautiful Colorado.  Ahhhhhh.  So...today I'm coming at you with some Pinterest favorites.  As you know I love me some spray paint.  I thought I would spread the spray paint inspiration through these great finds and hopefully get your creativity flowing and paint cans spraying!

My first find is for sure on my to-do list.  You may remember that about 10 seconds after our new couch was in the family room I realized I needed some side tables.  I actually showed you these from Ballard that are way out of my price range.

Bornova Side Table

But then I found this great idea on Pinterest and I think it might be the perfect solution...

spray paint a metel trash can and flip over for an instant side table. so cool.

Anyone know what that is???  It is a metal garbage can, spray painted and turned upside-down.  How awesome is that!  I love simple solutions with amazing outcomes.

Now if you haven't noticed we are right in the thick of garage sale season.  Around here they are everywhere!  I love it.  You can always find an old worn out brass lamp at a steal of a price.  Yeah at first glace they my seem ugly but just look at what a little spray paint can do.

spray paint old brass lamps
source

Add a fun shade and you have an awesome garage sale treasure!

Speaking of lights, did you see my new light fixture? What...you missed it?!?!  Well check it out here.  But that has nothing to do with spray paint.  Well, actually it has a little to do with spray paint because it left me with a metal chandelier that I am seriously thinking about spray painting (once I find a new place to put it).  Which is why I love these...

Spray Paint Chandelier
source

spray paint chandelier
source

Spray paint
source

All spray painted and all fabulous!

So if you are craving a simple and inexpensive project while I am away grab some spray paint and add a little more color to your life.  (Or you are welcome to come by and paint the rest of my dining room.) And don't forget to share what you create!  You can do that on Facebook, in a comment below or email me at missiondecorate@gmail.com.

spray paint YES!