
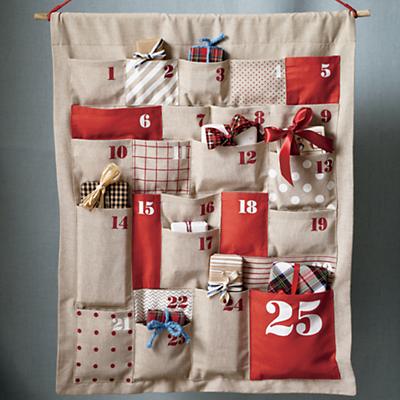
A few weeks back I hinted at the idea of making your very own versions of all that crafty stuff you see in the holiday catalogs. (You can jog your memory here.) So I followed my own lead and made an advent calendar from this inspiration from Land of Nod
And look what I created...

And although I may be a bit biased, I think I like mine better!
But I have to apologize because I can't seem to find all the pics I took as I put this together so as I describe the steps you will just have to close your eyes and imagine it as it comes together...sorry!
For starters you will need fabric. I chose outdoor fabric similar to canvas. I bought both tan and red. I also bought one spool of red & white thick ribbon, one wooden dowel and red and white thread. You will also need a number stencil, a black sharpie, a glue gun & string or ribbon to hand the calendar.
Before you begin you will need to make some simple calculations and measurements. Measure the space where you plan to hang the advent calendar and decide how big you want it to be. Then add an inch and a half to the width and 3 3/4 inches to the height to allow for seams. Next figure out how big you want each pocket. I did 5 rows of 5 so I took what the surface would be (after seams are sewn) divided the height by five and then subtracted 1 inch to allow for space between pockets. I did the same for the height. Once I checked all my measurements twice I started cutting. One large piece and 25 small pieces.
Now sew 3/4 inch seams on the two sides and bottom of the larger piece. Fold over the top edge 1 1/2 inches and sew your seam right along the bottom edge of the fold to create a pocket for the wooden dowel.
On to decorating the pockets. You can get creative here and decorate them any way you want but a number on each is very helpful. To make the number I used a stencil and a black sharpie. You can get fancy with paint but a Sharpie is so easy and I like the faded look you can create if you don't push down to hard. From there I glued on the red & white ribbon in different patterns on some pockets. I used scraps of the red and tan canvas on others. Anything goes!

Once all the pockets are decorated pin them onto the larger piece spaced as you want. I spaced my (kinda) evenly in numerical order but take a lead from the inspiration and space them out any way you want in any order you want. Then sew down the two sides and bottom edge leaving the top open to slip in the goodies! For the final step slide the dowel in through the top pocket and tie string or ribbon to either side so it is ready to hang.

In addition to candy and little goodies, I filled some of my advent pockets with slips of paper wrapped up like presents. Each paper has a fun activity to do that day...
make brownies
pick out a Christmas book at the library
make a snowman
drink hot chocolate before bed
walk around the neighborhood and look at Christmas lights
watch a holiday movie
Oh and don't let me forget the money breakdown! At Land of Nod this advent calendar is $39 plus tax, shipping and all that good stuff. It cost me $34 to buy all the materials I needed for this project. I know what you are thinking...only a few bucks savings! not even worth my time!. Oh but did I mention that I also made a table runner and a wreath for my front door with that same $34 of materials. HA! Now we are talking! You figure you would spend another $20 or way more for a table runner and $20 or way more for a wreath and that all adds up to $80 of fabulous decor for $34. I did it all for less then half and I still have fabric left over so more will be made. I Love DIYing!
And don't forget to share your "knock offs" cause we would love to see what all you crafties have been up to!